The Sandbox EDU

by Maya Staresinic 256x256bb

It is well known that many students enjoy the occasional video game. Time and time again I have heard students say, “When I got home I played some video games…” Well, we have found a game that brings students love for video games and learning into one big happy (and educational) concept. Inquiry-based problem solving and experiential learning meet in the middle with the Sandbox EDU game by PIXOWL INC. Students are naturally curious and want to feed their sense of wonder. The Sandbox EDU is the perfect game to satisfy the Maker in your classroom, in your household or even the Maker in you!

The game entices the user to play and learn, with its video game-like graphics and catchy musical additions. Specifically adapted for students ranging from 6 – 12 years of age, users will play, craft and build while interacting with the game. The Sandbox EDU captures the educational/maker sense with its ability to allow users to learn and conduct scientific investigations and engineering design through inquiry-based problem-solving in an open-ended world created by the game.

What is great about the game is that it really embraces STEAM learning. The user is required to solve problems, respond to scenarios using their critical thinking skills, construct or deconstrucscreen520x924-1
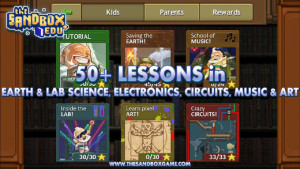
t environments, create art, design machines and so much more. The Sandbox EDU draws information, games, and tasks from a wide variety of subjects: Environmental Science, Physics, Geology, Biology, Engineering, Mathematics, Electronics and Circuits, Pixel Art, Music and Game Design. There is something for all interest. Experiential learning comes into play during the direct learning experiences users gain from engaging in concepts that are rooted in curriculum thinking. Concepts are drawn from such concentrations as functions, chemistry experiments, elemental reactions, art projects, probability, natural phenomena and more.

The Sandbox EDU by PIXOWL INC. can found on the iTunes app store $2.79

Posted in games, iTunes, Tech Tool Tuesdays | Leave a comment

PeerGrade

by Laura Dobosindex

Peergrade is an online platform that allows facilitation of peer assessment with students. Peergrade has made it easy for students to assess one another anonymously. You create an assignment, then students hand in their work online. The assignments are then distributed to other students in the class, randomly, and they provide feedback for their peers. The papers are then delivered back to the author with the feedback. You, as the teacher, now have access to the original assignments as well as the feedback that was given.

1-peergrade dashboard

One of the features that I really liked about peergrade is the rubric quality feature. The data that is collected is used to generate feedback, for you as the educator, about which questions in your rubric the students had a hard time answering and which questions generated the most feedback. This is something that could be useful when creating rubrics for assignments. Having this feedback would help ensure that your rubrics are useful and aid in student understanding of what is expected of them. This tech tool really promotes reflection, which is vital in learning and meta-cognition. I really like the peergrade interface and I believe that it could be utilized to ensure students are receiving feedback that is necessary for learning. I love that there is plenty of data and information about each student that is generated, such as how many assignments they’ve handed in, how many reports they’ve given feedback on, how long they worked to give feedback, their class ranking and plenty more. The account is free – students do need to set up an account to log onto your class.

index

PeerGrade is an online platform, and you can create your class account on their website.

Posted in assessment, collaboration, Tech Tool Tuesdays | Leave a comment

SketchUp

Screen Shot 2017-04-03 at 1.39.06 PMby Lauren Fridman

SketchUp is a 3D modeling software that tailors more to those who have tinkered with these types of CAD tools before. SketchUp is an intermediate-level software that will require some time to acclimate to. While TinkerCAD (which has been previously featured) utilizes a drag-and-drop model with a preset database of geometric shapes to create your model, SketchUp allows users to use shapes, lines or numerical data to bring a vision to life. Users can stretch, copy, rotate and maneuver their objects to meet their design requirements. The software is available online and will download as an application from the SketchUp website (https://www.sketchup.com).

However, the interface is quite a bit more complex than the likes of TinkerCAD. Users may first select the template options that are best suited for their design (millimeters, centimeters, meters, inches, feet, etc.) and then can begin to tinker with the multitude of design tool options. This software was designed with interest in the field of architecture and structural design, so there are many features that cater to that purpose and audience. These include straight-line features, rulers and the human form for size comparison.

Additionally, part of this online product includes a database of pre-existing designs that can be remixed and reimagined by the users. This “3D Warehouse” has all kinds of models and can be suited to the needs of any classroom or curricular connections. Any user can access these models and can add their own designs to the 3D warehouse as well for others to use! For access to this database, please follow the link: https://3dwarehouse.sketchup.com/?hl=en

There are 2 options for the program:

  • SketchUp Make (Free)
    • Allows you to tinker and create 3D models for design
  • SketchUp Pro ($695USD)
    • This is the full product with all features including importing/exporting abilities, animation functions, hand-drawn rendering and more.
    • However, there are additional options as far as educator and student fees. Those can be inquired specifically through the website.

For more information on purchasing this product, refer to their website.

Posted in 3D modelling, 3D printing, Tech Tool Tuesdays | Leave a comment

Animation Studio

256x256bbby Maya Staresinic

During our March Break Maker Camp, we noticed that some of the campers were really interested in creating their own animations. Yes, we showed them apps and software like Scratch 2.0and Scratch Jr., but one camper in particular was interested in working with an app that would allow her to be more creative and to infuse her artistic abilities into her animations. That’s when I decided to do some searching for an app that would allow the user to create their own films, stories, etc. while also allowing the user to completely personalize their animations. After doing some digging around, I stumbled upon the app Animation Studio by miSoft.

Animation Studio advertises itself as an easy to use animation app when creating your own animated movies. The app is user friendly and appeals to beginner animators all the way to seasoned veteran animators. This means that you can eith750x750bb-1
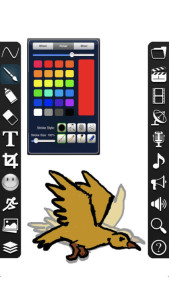
er submerge yourself into simple animations to get your footing, and when you are ready, you can go beyond and participate in more challenge animations. It is an app that will go at a pace comfortable for you. What’s great about the app is that it gives the user complete control of how their animation will turn out. You are able to add characters (either premade characters or you can fully develop and create a completely unique characters yourself), add backgrounds (again, either premade backgrounds or backgrounds you create yourself), and input soundtracks with voice, music and/or text to speech. All functions that give the user the ability to create a completely personalized animation, created from their imagination.

Going further into the apps features, users have the ability to import frames from videos to trace over or to add to their project throughout; to add unlimited layers to a frame; to link/copy layers between frames (giving you the ability to animate only what you wish to animate or to have static objects), to define the camera’s position (rotate, zoom, swivel), and to cut-out elements from a scene to save them to a clipboard for later use or to share between projects. When it comes to creating your own character(s), there are eight realistic, pressure-sensitive brushes that really give the user the ability to create a “life-like” character.

Talking about the app and sharing its features with you can only do so much. To really understand and see the capabilities of the app, please check out the following animation created using Animation Studio https://www.youtube.com/watch?v=i2bD7eVtClo

Animation Studio is available from the app store for $4.99

Posted in image editing, Tech Tool Tuesdays | Leave a comment

Arduino UNO

by Laura Dobos

Image result for arduino uno and breadboard

My most recent tech tool exploration was with a tool made by Arduino, called the Arduino UNO. Within the lab, we have the project kit, which comes with the Ardunio UNO, a breadboard (the part with the circuit connections), bulbs, various sensors, wires and a number of other circuit accessories. For someone who hasn’t used many sophisticated coding and circuitry products, the instruction manual that came in the kit was a saviour. There was an explanation of each accessory and how it is used, and it also has projects that are laid out step-by-step to help even the most novice of coders understand what is being done. The Arduino UNO is an amazing product, for people who are either good at coding, or are willing to encounter a lot of problem-solving and patience. Now, I am by no means an expert coder – I have become quite competent at block coding, and therefore have a good understanding of sequential thinking, which, some would argue, is essential for coding, but I digress. I really enjoyed learning how to create circuits on the Arduino, then using the software interface on my computer to code the Arduino to do certain things. My favourite project used a heat sensor and light bulbs to indicate how hot something touching the sensor is. To do so, I had to create parallel circuits, using resistors, different outputs, the light bulbs and the heat sensor. Once the circuit was created on the breadboard, and the breadboard was connected to the Arduino, I coded the Arduino to turn on specific light bulbs depending on the temperature of the item touching the sensor. The project was somewhat intensive, however when I was finished and the project worked, I felt so accomplished and my knowledge about circuitry and coding the Arduino was much greater. 

The Arduino UNO is a fabulous tech tool for intermediate classrooms, as it promotes understanding of various aspects of circuitry, sequential thinking, problem-solving and coding. I found there was a steep learning curve initially, but as I got more comfortable with the concepts (and with the help of the projects manual), I was capable of doing much more in a short amount of time. If you have an interest in technology and want a cool new tool to learn about, Arduino UNO is definitely a fabulous option.

Arduino UNO is available through the Arduino Website.

Posted in circuits, coding, Tech Tool Tuesdays | Leave a comment

Sketchboard.io

by Lauren Fridman

Screen Shot 2017-03-21 at 12.25.15 PMI recently discovered a mind-mapping tool that redefines the limitations set by many tools before. Traditional mind-mapping tools limit you to simple shapes (circles, squares, and ovals) to represent your ideas but these may not enable you to share your ideas in the most effective way possible. Insert Sketchboard.io, a newer online tool that widens the horizons of what you can do in a mind map. With over 50 icons and an interface that is very similar to working on a sheet of paper, Sketchboard.io enables users to produce something in a familiar environment with a wide array of tools. If you cannot find an icon that accurately represents what you are describing, there is a freehand tool option to create one that is more suitable to your needs.

Additionally, the application enables you to collaborate with others on the same document, add unlimited items to the map and shift the separate items around as needed. Collaboration may take form as individuals in the same room or from different parts of the world. Users can connect with each other through Google Drive and they can all access their Sketchboard.io products from there. Sketchboard.io is a browser-based application that functions on all computer interfaces (Mac, Windows and Linux).

There are a variety of pricing options available and those can be found here: https://sketchboard.io/pricing

Posted in mind-mapping, Tech Tool Tuesdays | Leave a comment

Lightbot

Unknownby Maya Staresinic

With all of the talk surrounding coding, it seems as if teaching our students how to code has recently become viewed as good teaching practice. Although today’s modern students are more advanced in technology than students ever before, learning to code can be somewhat of a daunting task for them. This is where the app Lightbot : Code Hour comes in to save the day!

Lightbot is an introductory coding platform that uses simple click and drop coding blocks to teach students basic coding knowledge. Simply put, Lightbot will get your students hooked on coding as fast as they can say “computer science”! With Lightbot, students are prompted to complete programming puzzles that require them to use programming logic and to put forth their problem solving skills. The app can be used throughout a variety of grade levels, but our suggestion is to use Lightbot in the Primary grades to establish basic coding knowledge at a young age that can then be built off of.

The student’s goal is to move their Ligthbot character from the beginning of a puzzle to the end of the puzzle by providing their character with the proper commands. Students gain a practical understanding of basic concepts like instruction sequencing, procedures and loops, just by simply guiding their Lightbot character. The Lightbot character moves throughout the puzzle by moving along tiles. The puzzles start off with very basic movements; think move forward, turn left and turn right blocks. In order for the Lightbot to know that it has completed its journey, the student needs to make sure that there is an “end code” block, which is shown in the form of a light bulb. This coding block will make the Lightbot and tile light up in conjunction with one another when the level is successfully completed, hence the name “Lightbot”. As the coding puzzles progress, the app introduces the student to new coding blocks that enable the Lightbot to participate in more complex movements. Lightbot: Coding Hour offers students 20 levels to participate in and practice their coding. Once all 20 levels have been successfully completed, the student is awarded with a certificate of completion, which adds yet another element of fun to the app.

unnamedLightbot is a great introductory app to start your students off on their lifelong coding adventure. It is a fun, interactive and coding centered app that will provide your students with the necessarily baseline skills to become avid coders.

Lightbot : Code Hour is free from the iTunes App store. Once students have completed all 20 levels, the Lightbot : Programming Puzzles app (which feature even more levels and challenges) can be purchased for $3.99. It can be played online and is compatible with iOS and Android systems.

Posted in coding, games, iTunes, Tech Tool Tuesdays | Leave a comment

Ozobots

by Brendan Oldman

Ozobot1So cool!!

Okay… we say this about all the gadgets and devices we get into the lab, but this one we truly mean it. From portraits drawn on paper with markers, to digital portraits on mobile devices, to coding race tracks and dance moves, this little programmable robot can do it all!

Although this device is fairly new to the market, it is being introduced to students as a means for not only computational thinking, but also as a way to write and theme stories, draw games and puzzles and personalize learning in new ways. This two-inch robot is quite sophisticated, and is able to move thanks to numerous sensors, micro-motors and driven by a USB lithium battery. This device operates on its own language and interacts with 4 basic colours (Black, Red, Green, Blue) and also digital block codes that you connect together. Any marker or ‘hue’ of the following colour will work, the Ozobot is a very smart character. Their website has several ideas and multiple resources, pre-created kits, as well as concepts setup in puzzle, maze and code format. It has blank slates also which allow for students to think outside the box, creating boundaries, brain teasers, obstacles and ‘turbo boosts’ of their choice.

You can control the speed, direction, and set dozens of motion ‘codes’ which can be drawn on paper or directly onto the screen of your mobile device. The robot can be programmed to follow the codes laid out by you and can really bring your art, puzzle, game or racetrack to life. The sequence of the colour codes dictates how the robot reacts and influences the speed, turns, lights, jumping moves, etc. This little robot is even programmable with the TickleApp and its own line of interactive tools! The applications and interactive tools that Ozobot have launched leave lots to be desired. It would be great to have a resource bank and online community network similar to what Scratch has created, fingers crossed!

An update on Ozobot will certainly be happening in the near future!

Ozobot2

Posted in coding, robots, Tech Tool Tuesdays | Leave a comment

Aurasma

Image result for Aurasma

by Laura Dobos

Recently I was introduced to virtual reality and augmented reality by our VR/AR expert within the lab Melanie Maas. Augmented reality takes a real world image and applies a computer-generated augmentation, bringing the image to life. The well-known app Snapchat utilizes augmented reality. I was amazed at all the capabilities that these technologies allowed within the classroom.  After some exploration and inquiry-based learning, I had a grasp on how I might incorporate these technologies into the classroom. Melanie introduced me to Aurasma, which is an augmented reality app. Aurasma allows you to create your own augmented reality images in a few easy steps. In the app, you will be prompted to create an account the first time you use – all your creations will then be kept in one place. Once you have an account, to create an augmentation, tap the ‘+’ and you will then be prompted to take your ‘trigger picture’. Once you have your photo, you can either choose one of Aurasma’s preset augmentations, or you can create your own video to layer over the photo. I’m still playing around with the green screen and the capabilities of creating augmentations without a background – stay tuned to hear how that goes. Overall, I love Aurasma and the connections that can be made between curriculum and applications of the app. If you’re looking to create engaging lessons for students, definitely look into Aurasma!

Image result for Aurasma

Posted in augmented reality, Google Play, iTunes, Tech Tool Tuesdays | Leave a comment

Seesaw

seesaw-appby Maya Staresinic

What happens to you when I say the following: excellent parent/teacher communication, formative assessment and independent documentation of learning? Is your brain spinning? Maybe a little bit of steam coming out of your ears? As teachers we try our very best to attain and practice the above in our classroom. But I get it; it’s not always easy. We have multiple items on our plate at one time. We want to create an environment where our students can be their best, while giving them the opportunity to connect, reflect and share their learning with their peers, their parents and their teachers.

Seesaw is an app that allows for just that to take place. By using Seesaw, students are able to create digital portfolios that capture their learning in any form. Seesaw allows students to demonstrate “what they know” by uploading photos, videos, drawings, text, PDFs, links, and so much more. When a student uploads content to their Seesaw journal, it is immediately accessible by the teacher. Both the teacher and the students are able to review progress over time and demonstrate growth. It is the ultimate app for tracking independent learning. The app makes it easy for the teacher to review work from an entire class or from a specific student. Teachers are able to organize work by using folders to separate different subjects, projects or activities.

The app creates an opportunity for the student to advocate for himself or herself. It makes them more responsible and places them in a position of accountability when it comes to their work. The beauty of the app is that it does not just capture the end result, but helps capture the entire lea1474597335049
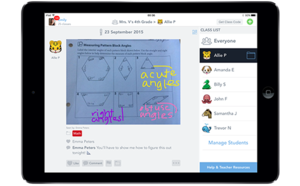
rning process. Seesaw gives the students the ability to record themselves, draw or caption tools to reflect on what they’ve learned, how they learned, their struggles, and how they came up with the answer. From there, real and informative feedback can be provided to the student that will encourage deeper thinking.

One of the “best” features of the app, is that it strengths the connection between school and home. The parents of our students are busy people and it is not always possible for them to attend meetings and take phone calls from their child’s teacher. Teachers can invite parents to view updates to their child’s Seesaw journal, which involves them in the learning process. Parents can log onto their child’s Seesaw journal from anywhere at anytime.

Seesaw is supported by iOS devices, Android devices, Kindle Fire, Chromebooks and computer with Chrome or Firefox.

For a list of pricing please visit http://web.seesaw.me/pricing/

Posted in Google Play, home communication, iTunes, portfolio, Tech Tool Tuesdays | Leave a comment

Lego Robotics

by Laura Dobos

unnamedA few years ago when I was introduced to LEGO robotics I was blown away by the idea that, for a reasonable cost, someone could actually own a transformable, customizable and programmable robot. Initially, I used NXT, however, more recently I have been using the EV3, which is the newest generation of LEGO Mindstorm. These two models are very similar and work in almost the same way, however the EV3 software is more sophisticated and streamlined versus the NXT software. Using LEGO robotics with students has been really enjoyable, because not only does it instil the concept of computational/sequential thinking, but it allows for students to express their creativity with their builds as well as the story or concept behind their robot. Mindstorm is the software that has been developed to work alongside the robots, and I absolutely love it. Through Mindstorm, LEGO provides tutorials so that even a novice to coding can go through the most rudimentary concepts and understand what they are doing. Mindstorm is a drag and drop platform, which means that the movements and commands are chosen and linked together to create the code; there is no coding language knowledge needed to understand and use the LEGO robotics.
45544_mod_gyroboy_01_left_4to3ratio-67080b5d15baa22f251f1f46992c4746
LEGO robotics is a tech tool that is fun and gives students an opportunity to learn about coding in a way that gives them a hands on, real world experience. Some connections that can be made to curriculum include the concept of sentences and sentence structure, with the idea of proofreading and problem solving to complete a task with the robot. Engineering and mathematics are also easily connected to the functions and movements of the robots.

LEGO robotics are available for purchase through LEGO.com (https://www.lego.com/en-us/mindstorms), and there is an education page for classroom incorporation (https://education.lego.com/en-us). The Mindstorm download is available through their website as well.

Posted in coding, lego, robots, Tech Tool Tuesdays, Uncategorized | Leave a comment

Within

by Maya Staresinic

Picture thiunnameds. Your History class is in the middle of studying how groups of people have been displaced throughout our history. You are particularly looking at the 60 million people who have been displaced from their homes by war and persecution. You notice that your students are not as engaged as you want them to be. You had hoped this lesson was going grasp them and make it so they had so many questions, ideas and concerns that the inquiry within the classroom was going to be busting at the
seams! Why not try an approach that utilizes virtual reality (VR).

I am specifically talking about using an app called Within. Before I continue, the story that could be used on the Within app in the above scenario is called The Displaced. This particular story focuses on three children – from South Sudan, Syria and the Ukraine, who have been displaced by war. Through this VR story, you are able to witness their limited options as refugees, as well as the resiliency they display in their situations.

Although I am discussing one specific story that can be found on the Within app, Within houses a multitscreen696x696
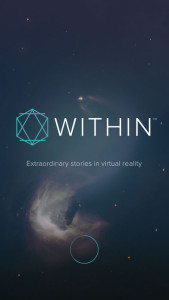
ude of VR stories that range from stories created from pure imagination, all the way to documentaries that take you further beyond the situations that grip our world. The app was created with the goal of exploring and expanding the potential of immersive storytelling. Within draws innovation, entertainment and informative real-world stories together, and immerses the user through the use of VR. The app combines high-definition 360 videos with “like you are there” sound, to create an atmosphere that allows the user to fully be in the moment. The user is given the chance is go even further than what can be found in a book or through a movie, allowing for deep-rooted curiosity and understanding to take place.

Within can be used with a simply made Google cardboard VR headset, but also supports all major headsets, including Oculus Rift, Samsung Gear VR, HTC Vive, Sony PlayStation VR and Google Daydream.

Within is compatible with Apple and Android products. The app is free to download through the iTunes store or through Google Play.

Posted in Google Play, iTunes, Tech Tool Tuesdays, virtual reality | Leave a comment

Green Screen

by Laura Dobos

indexGrowing up, one of my favourite movies was The Parent Trap (I mean come on, that handshake between Martin and Annie before she leaves for camp – so cool!). At the time, I always though that Hallie and Annie were twins in real life and therefore two different actresses. My mind was blown the day I found out that it was one actress – Lindsay Lohan. How did they put her in the same scene, at the same time?! My desire to learn about the cinematography behind my favourite childhood movie lead me to learning about green screens and how they can be used in a Makerspace.

A green screen is a tool that has been used in the film industry since the 1930s. Green screens have allowed film makers to create masterpieces, by filming in front of the bright green screen and the use of software to transform the background. This technology has recently become available to amateur film makers (ie. our students) through various apps, a green wall and a tablet or video camera. Do Ink is an app that we use in the lab to achieve the same film magic that happens in Hollywood. We have found that Do Ink is really user friendly – there is a tutorial that takes you through the various capabilities of the app when you download. With footage in front of a green screen, you are able to alter backgrounds to allow students to travel to the ends of the earth or you can create videos of that same person that overlap – creating the illusion of twins. It has been a lot of fun learning about the Green Screens and their place in the classroom, with connections to Biology (have students take you for a tour of a cell), English (re-enact Romeo confessing his love to Juliette on her balcony), Geography (have students try being a meteorologist for the day!) and so many more!

Do Ink is available in the app store for $3.99 CAD

Posted in green screen, Tech Tool Tuesdays, video production | Leave a comment

Thingiverse

by Maya Staresinic

Screen Shot 2017-02-01 at 1.59.37 PMYou have this great new 3D Printer that has just been added to your Makerspace, but you are a little unsure of how to go about creating. You want to create a replica of a dinosaur’s skin to be able to show your grade 1 class to explain to them how repeated lines and shapes are used to depict texture, but creating this will be quite complex. Don’t move onto the next idea just yet!

Thingiverse is a design community that has been created for discovering, making and sharing 3D printable objects. It is one of the world’s largest 3D printing communities that houses items from a simple sphere, to the skull of a Tyrannosaurs Rex. The website allows the user to create, remix and build off of 3D items that have already been created and uploaded by someone else. All designs that are found on Thingiverse are encouraged to be uploaded under a Creative Commons license, so that anyone can use and alter the design.

It is an easy to use platform that allows the user to download the item or design they want to build off of before remixing it. The website uses an STL file (STereoLithography) that is a format that is original to the stereolithography CAD software created by 3D Systems. The STL file(s) convert seamlessly into your 3D printing software to allow you the ability to print it right away or remix it.dinoskull_fixed_preview_card

The beauty about Thingiverse is that it can be used to create items that pertain specifically to the curriculum to allow for a deeper understanding of the content, or it can be used to print items that will help with student concentration. If you can think of it, Thingiverse (most likely) has it.

Visit Thingiverse here!


Posted in 3D modelling, 3D printing, Tech Tool Tuesdays, Uncategorized | Leave a comment

Google Earth

by Maya Staresinsic

Google Earth is an app that allows your students to fly around the planet and visit the
Pyramids of Giza the same day they explore the Mayan Temples in Mexico. With the swipe of a finger, the user is transported to a desired location around the world. Google Earth can be used to with most PC systems, with Mac systems either 10.6.0 or higher and Linux systems.

Googlunnamede Earth is a geobrowser that accesses satellites and aerial imagery along with other geographic data over the Internet to represent the Earth to the viewer as a three-dimensional globe. The app depicts its imagery in 3D form to make cites, towns, rural areas, forests, etc. come alive. Flying through complete 3D recreations of select areas gives your students the ability to understand such things as infrastructure, geography and more.

Google Earth allows for the user to take a birds eye view of an area, transport to street mode for a more “really there” feel, view Earth from the solar system and see a city from a satellites point of view. The Maps Gallery feature allows the user to view various maps, plot real-time earthquakes, view planes that are in flight and much more. The Google Earth app is the next best thing to having a fully loaded Virtual Reality kit in your classroom.

You can find the Google Earth app on iTunes


Posted in geography, iTunes, Tech Tool Tuesdays | Leave a comment

Tickle

by Lauren Fridman & Maya Staresinic

images

Tickle is an app that runs on Apple devices and allows users to create block codes for their programmable robots. The app functions with a multitude of robots including Sphero, BB8, Ollie, Dash and Dot. The interface is incredibly simplified and operates in a way that allows beginner coders to program in a successful and user-friendly way.

We have used this app countless times when interacting with students as young as 6 and teachers and adults well into their 60s making it the ideal introductory tool for coding. Users can create a sequence of events that they would like their bot to complete and drag-and-drop the coding blocks to program their robots. Since coding has began to grow in popularity in the education system Tickle offers users an opportunity to begin expanding their coding knowledge on an app that functions similarly to other coding mediums. The low-level entry point required to use Tickle makes it ideal for even the most nervous of users.

Currently you can find Tickle in the Apple Store.

Posted in coding, iTunes, Tech Tool Tuesdays, Uncategorized | Leave a comment

StoryBird

by Lauren Fridman

Storybird has created a new way for students to tell their own stories. With an extensive collection of artwork to choose from, students can be inspired to write in ways that they may not have on paper. Students can use the licensed artwork to add life to a pre-existing story or allow the images to direct their story-writing process.

The website is very user friendly, and can be used alongside any curricular subject, from the junior grades all the way through high school. I have used this tool with middle school students to bring an Aesop’s fable new life. Each student chose their own fablStoryBird_site_headere, searched StoryBird for artwork that fit their plotlines and if nothing worked, they got creative and re-invented their Aesop’s fable. The only real constraint of this tool is that students can only use the artwork from the site. So, this may limit their abilities to tell the story they may have had in mind, and this was the main frustration expressed by the middle school students who used it with us in the lab. However, even with this hindrance in mind, the students mostly enjoyed using the program and would attempt it again. Check out the site here to get making or to explore what others have created: https://storybird.com/

Posted in language, storytelling, Tech Tool Tuesdays | Leave a comment

Word Swag

by Laura Morrison

We love Word Swag — the cool typography-generating app that combines words and images to WordSwag
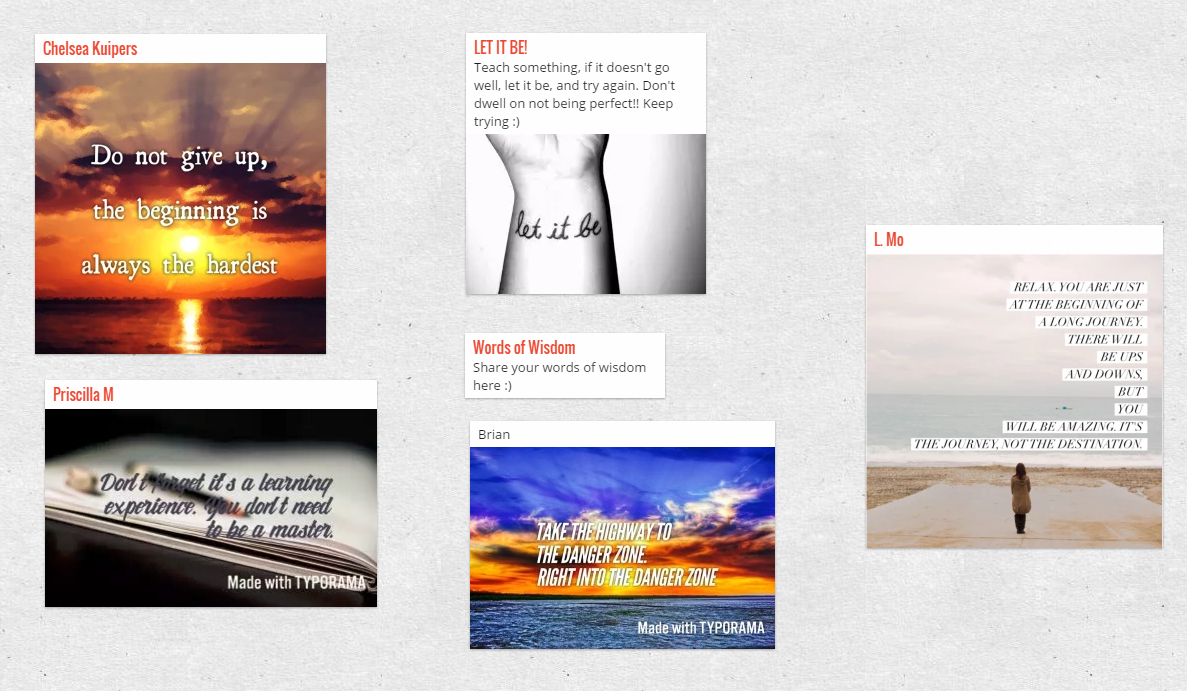
eloquently (and creatively!) communicate a message. This tools is particularly great to use in the English Language Arts classroom as a warm-up activity, a medium for a ticket-out-the-door or as a visual aid in a story, report or presentation! Although this app has a small charge, there is another, similar app that can be downloaded for free called Typorama.

To encourage my B.Ed. students before they ventured out on placement recently, I created
a WordSwag positive-power message for them and posted it on the collaboration website, Padlet. Padlet is great because anything can be shared on this site (text, images, video) by anyone with a link. Users don’t need a password and can post content instantly. After the students read my positive-power message, I asked them to create their own “Words of Encouragement” WordSwag or Typorama message and to share it with their peers on the same Padlet wall. Below is a sample of what was shared. Click to enlarge the image and for the higher rez version.

Words of Encouragement

Click to enlarge the image. B. Ed. Padlet Wall: Words of Wisdom

Posted in language, Tech Tool Tuesdays, typography | Leave a comment

Circuit Stickers

Circuit Stickers are a new and fun way to build electronics that have been created by the makers of Chibitronics. They are peel-and-stick electronics that can be used for crafting electronics either at home or with your class. Check out the video and learn more about Circuit Stickers here Circuit Stickers

Screen Shot 2016-10-31 at 2.27.01 PM

Posted in circuits, consumables, Tech Tool Tuesdays | Leave a comment