
Each week, we review a new tech tool that can help enhance student engagement and support overall learning. See below for the tools we have already reviewed, and check back weekly for new tools to try!
Follow Our Socials:


Each week, we review a new tech tool that can help enhance student engagement and support overall learning. See below for the tools we have already reviewed, and check back weekly for new tools to try!
![]() by Zeynep Gecu-Parmaksiz
by Zeynep Gecu-Parmaksiz
Padlet is a dynamic online bulletin board that enables you to share different types of content, tasks, questions, or ideas with your students, colleagues, or parents/guardians. It is also an effective way for educators and students to collaborate online, especially during remote schooling as experienced during the COVID-19 pandemic.
After signing up for an account, you have two options for membership. You can use the 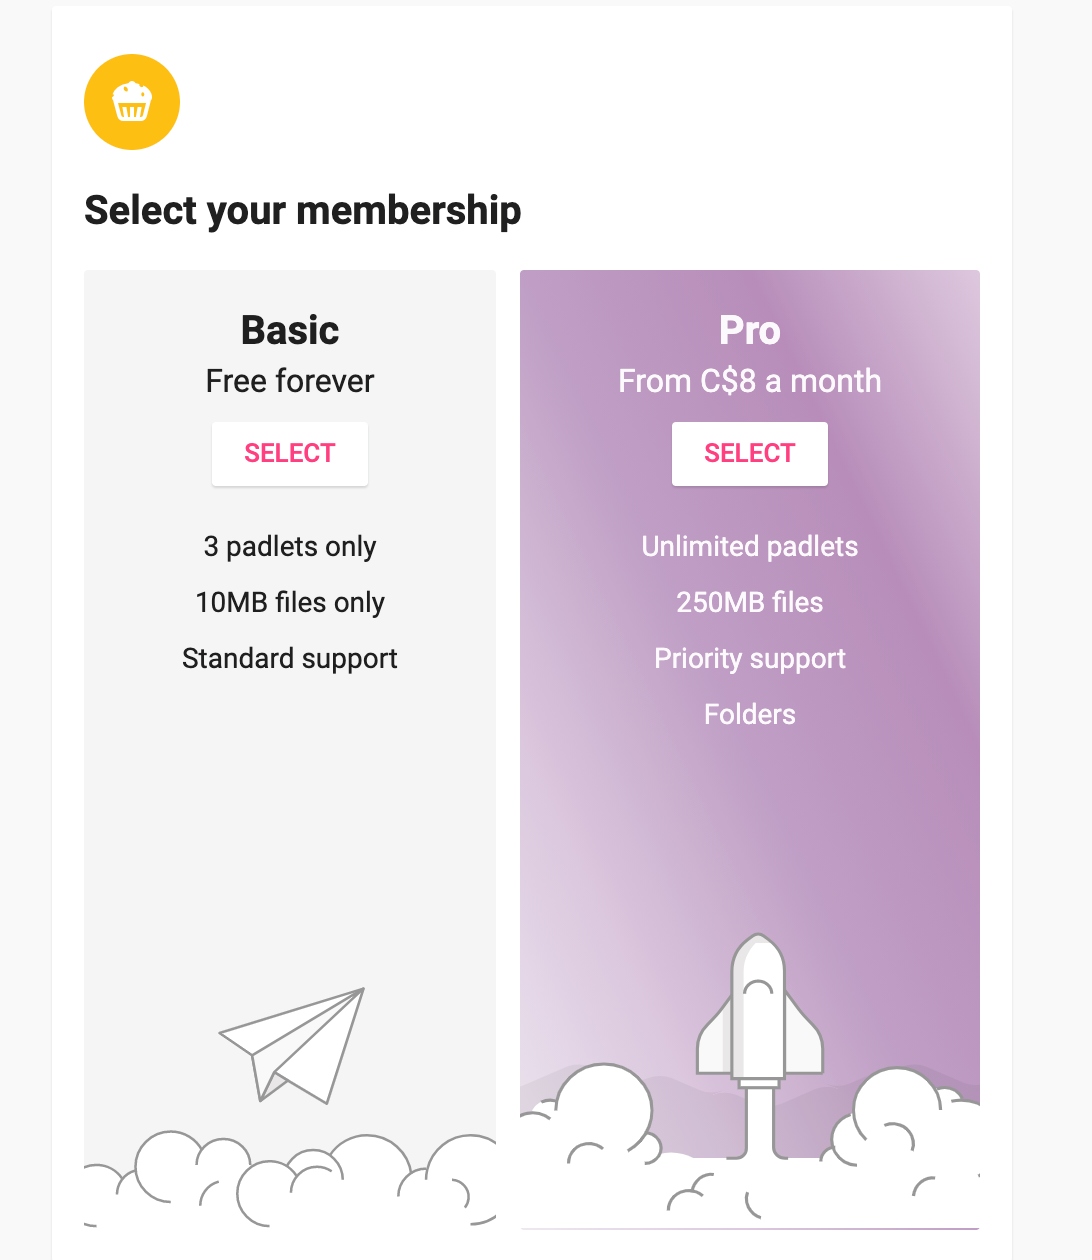 free version (limiting you to creating three Padlets at any given time) or you can upgrade your membership to the pro version to benefit from options like additional storage space. However, if you will not need more than three Padlets at a time, you can free up space in your free account by deleting previous Padlets once you have finished with them.
After signing in, you can open Padlet on your smartphone or your computer and see what’s on it and what participants are writing. Users can upload just about any type of file, such as video, audio, links, YouTube videos, or images — if it’s digital, you can add it to a Padlet!
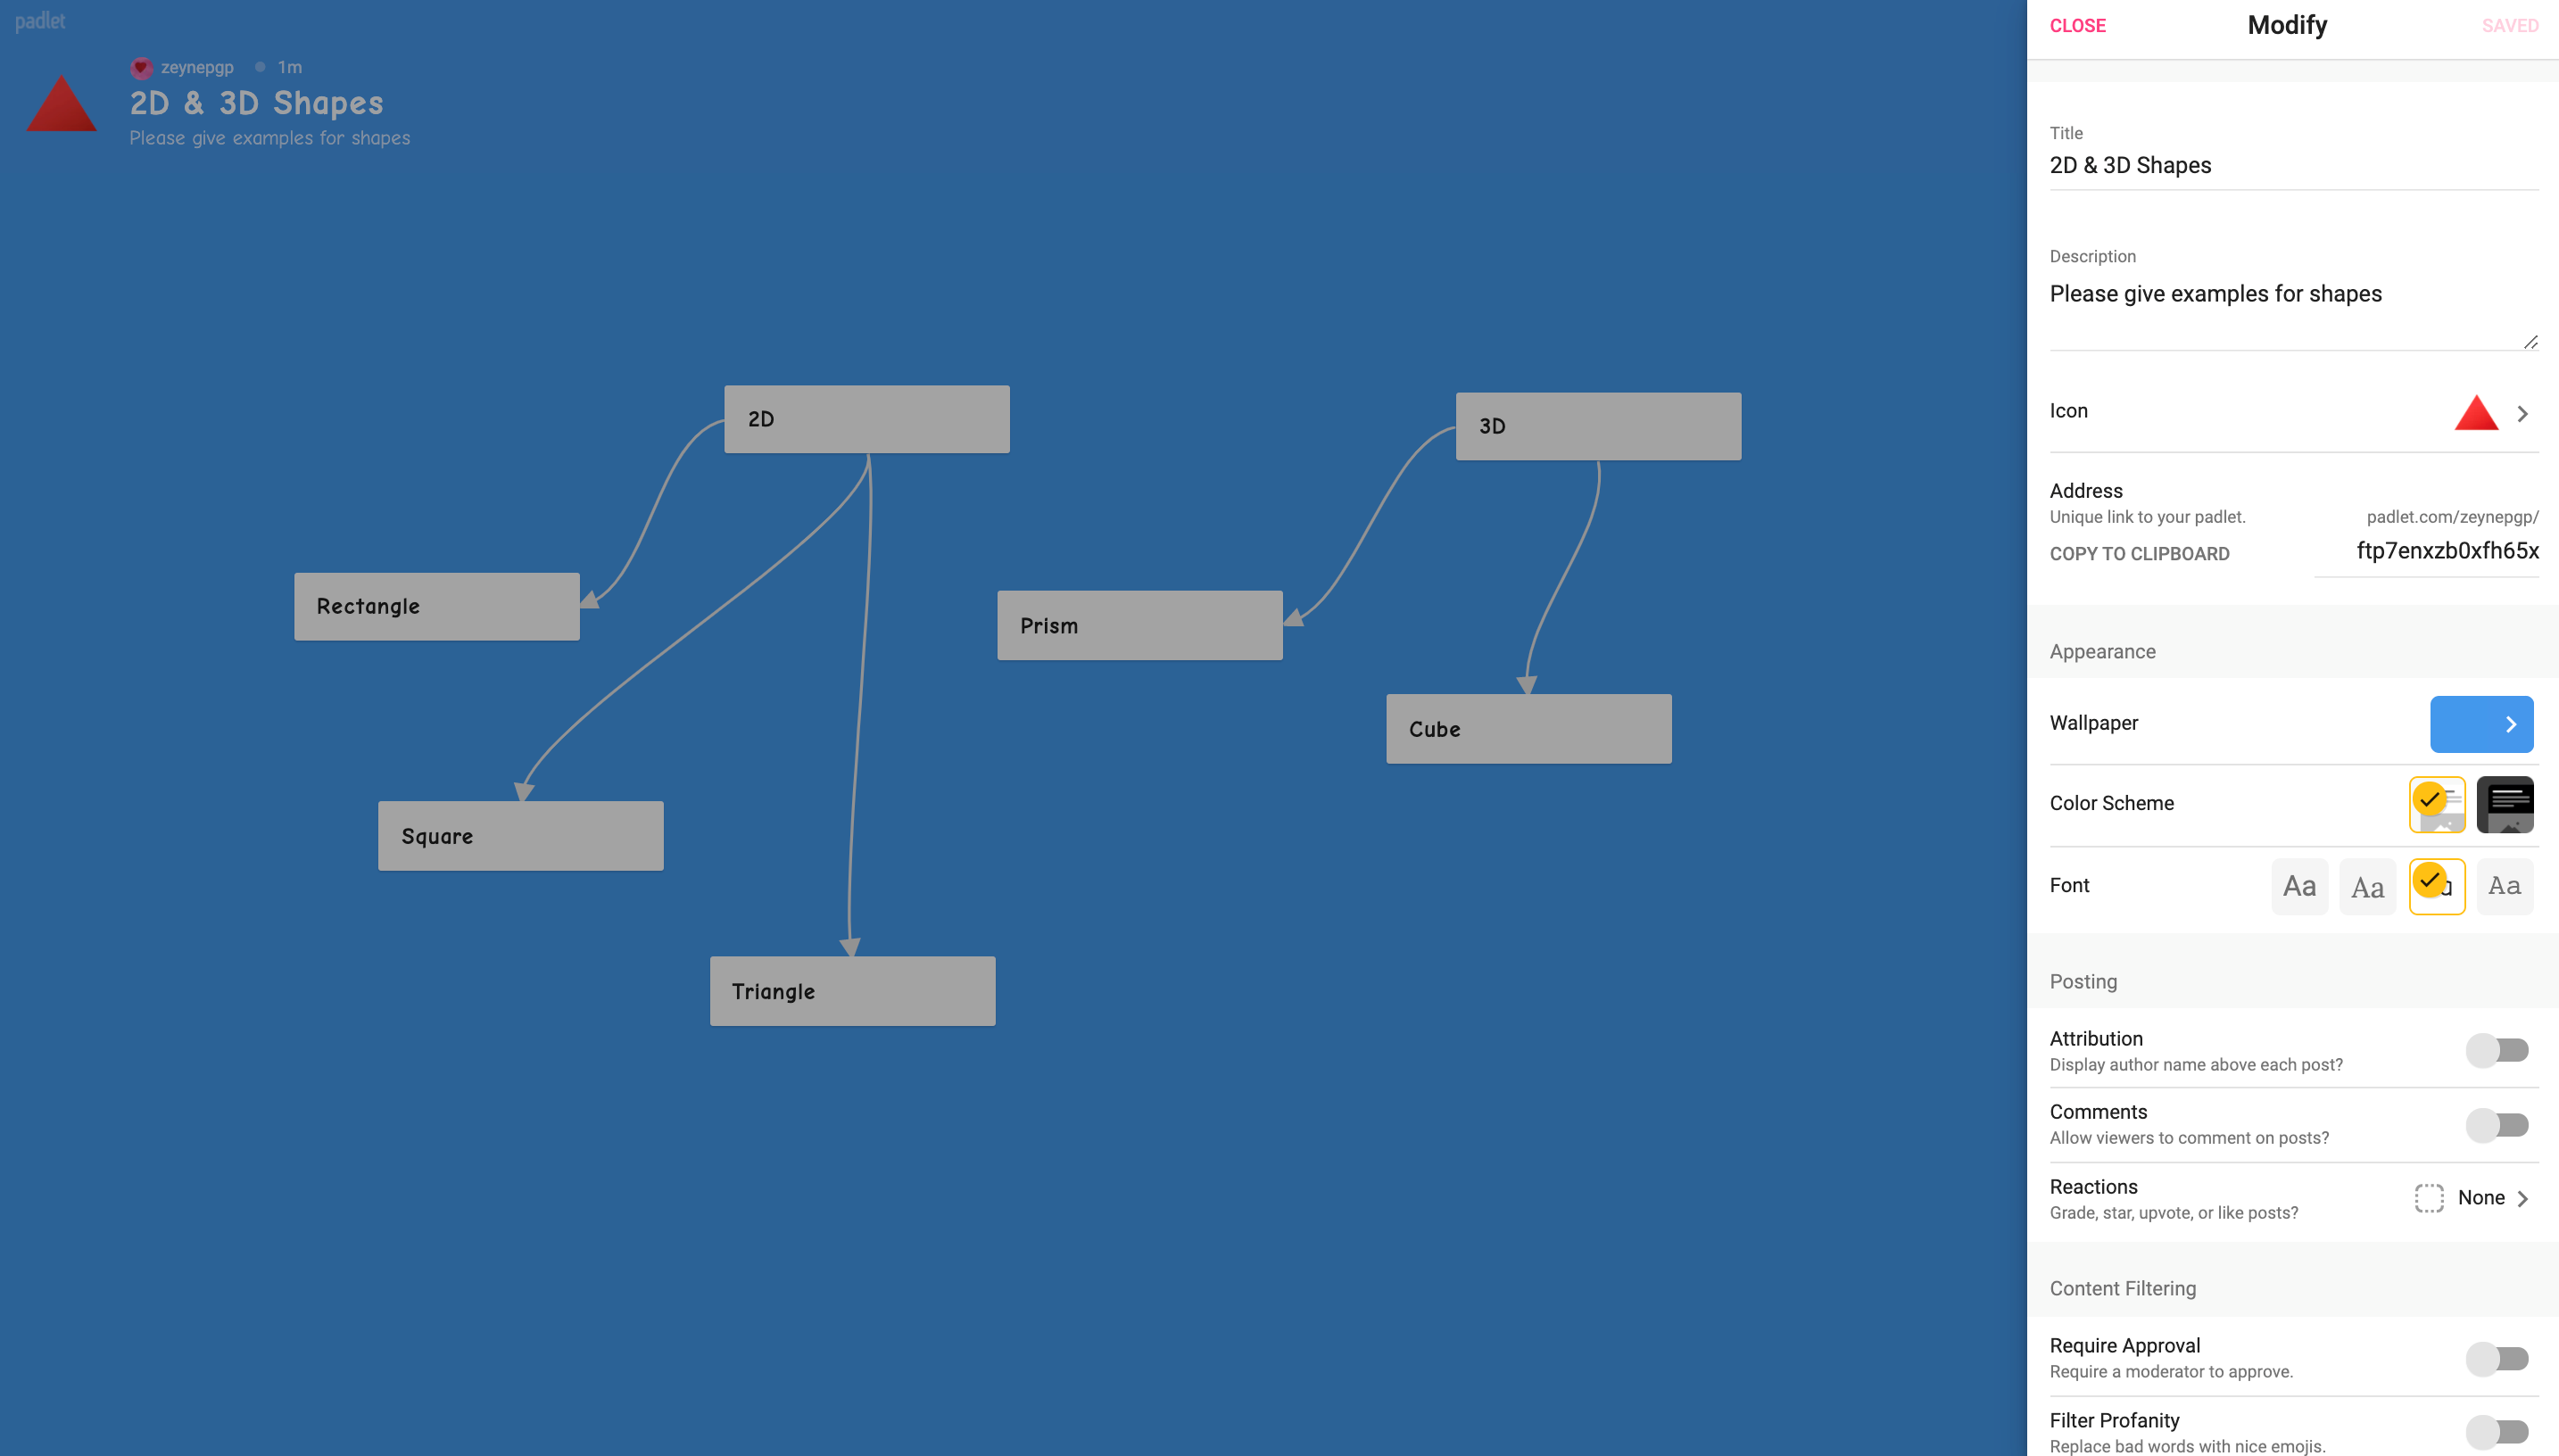
As you create your first Padlet, you have numerous options to modify the appearance, icon, title, description, and URL for access. Moreover, you have posting- and content-filtering options that allow for comment restriction, enable users to comment anonymously, etc.
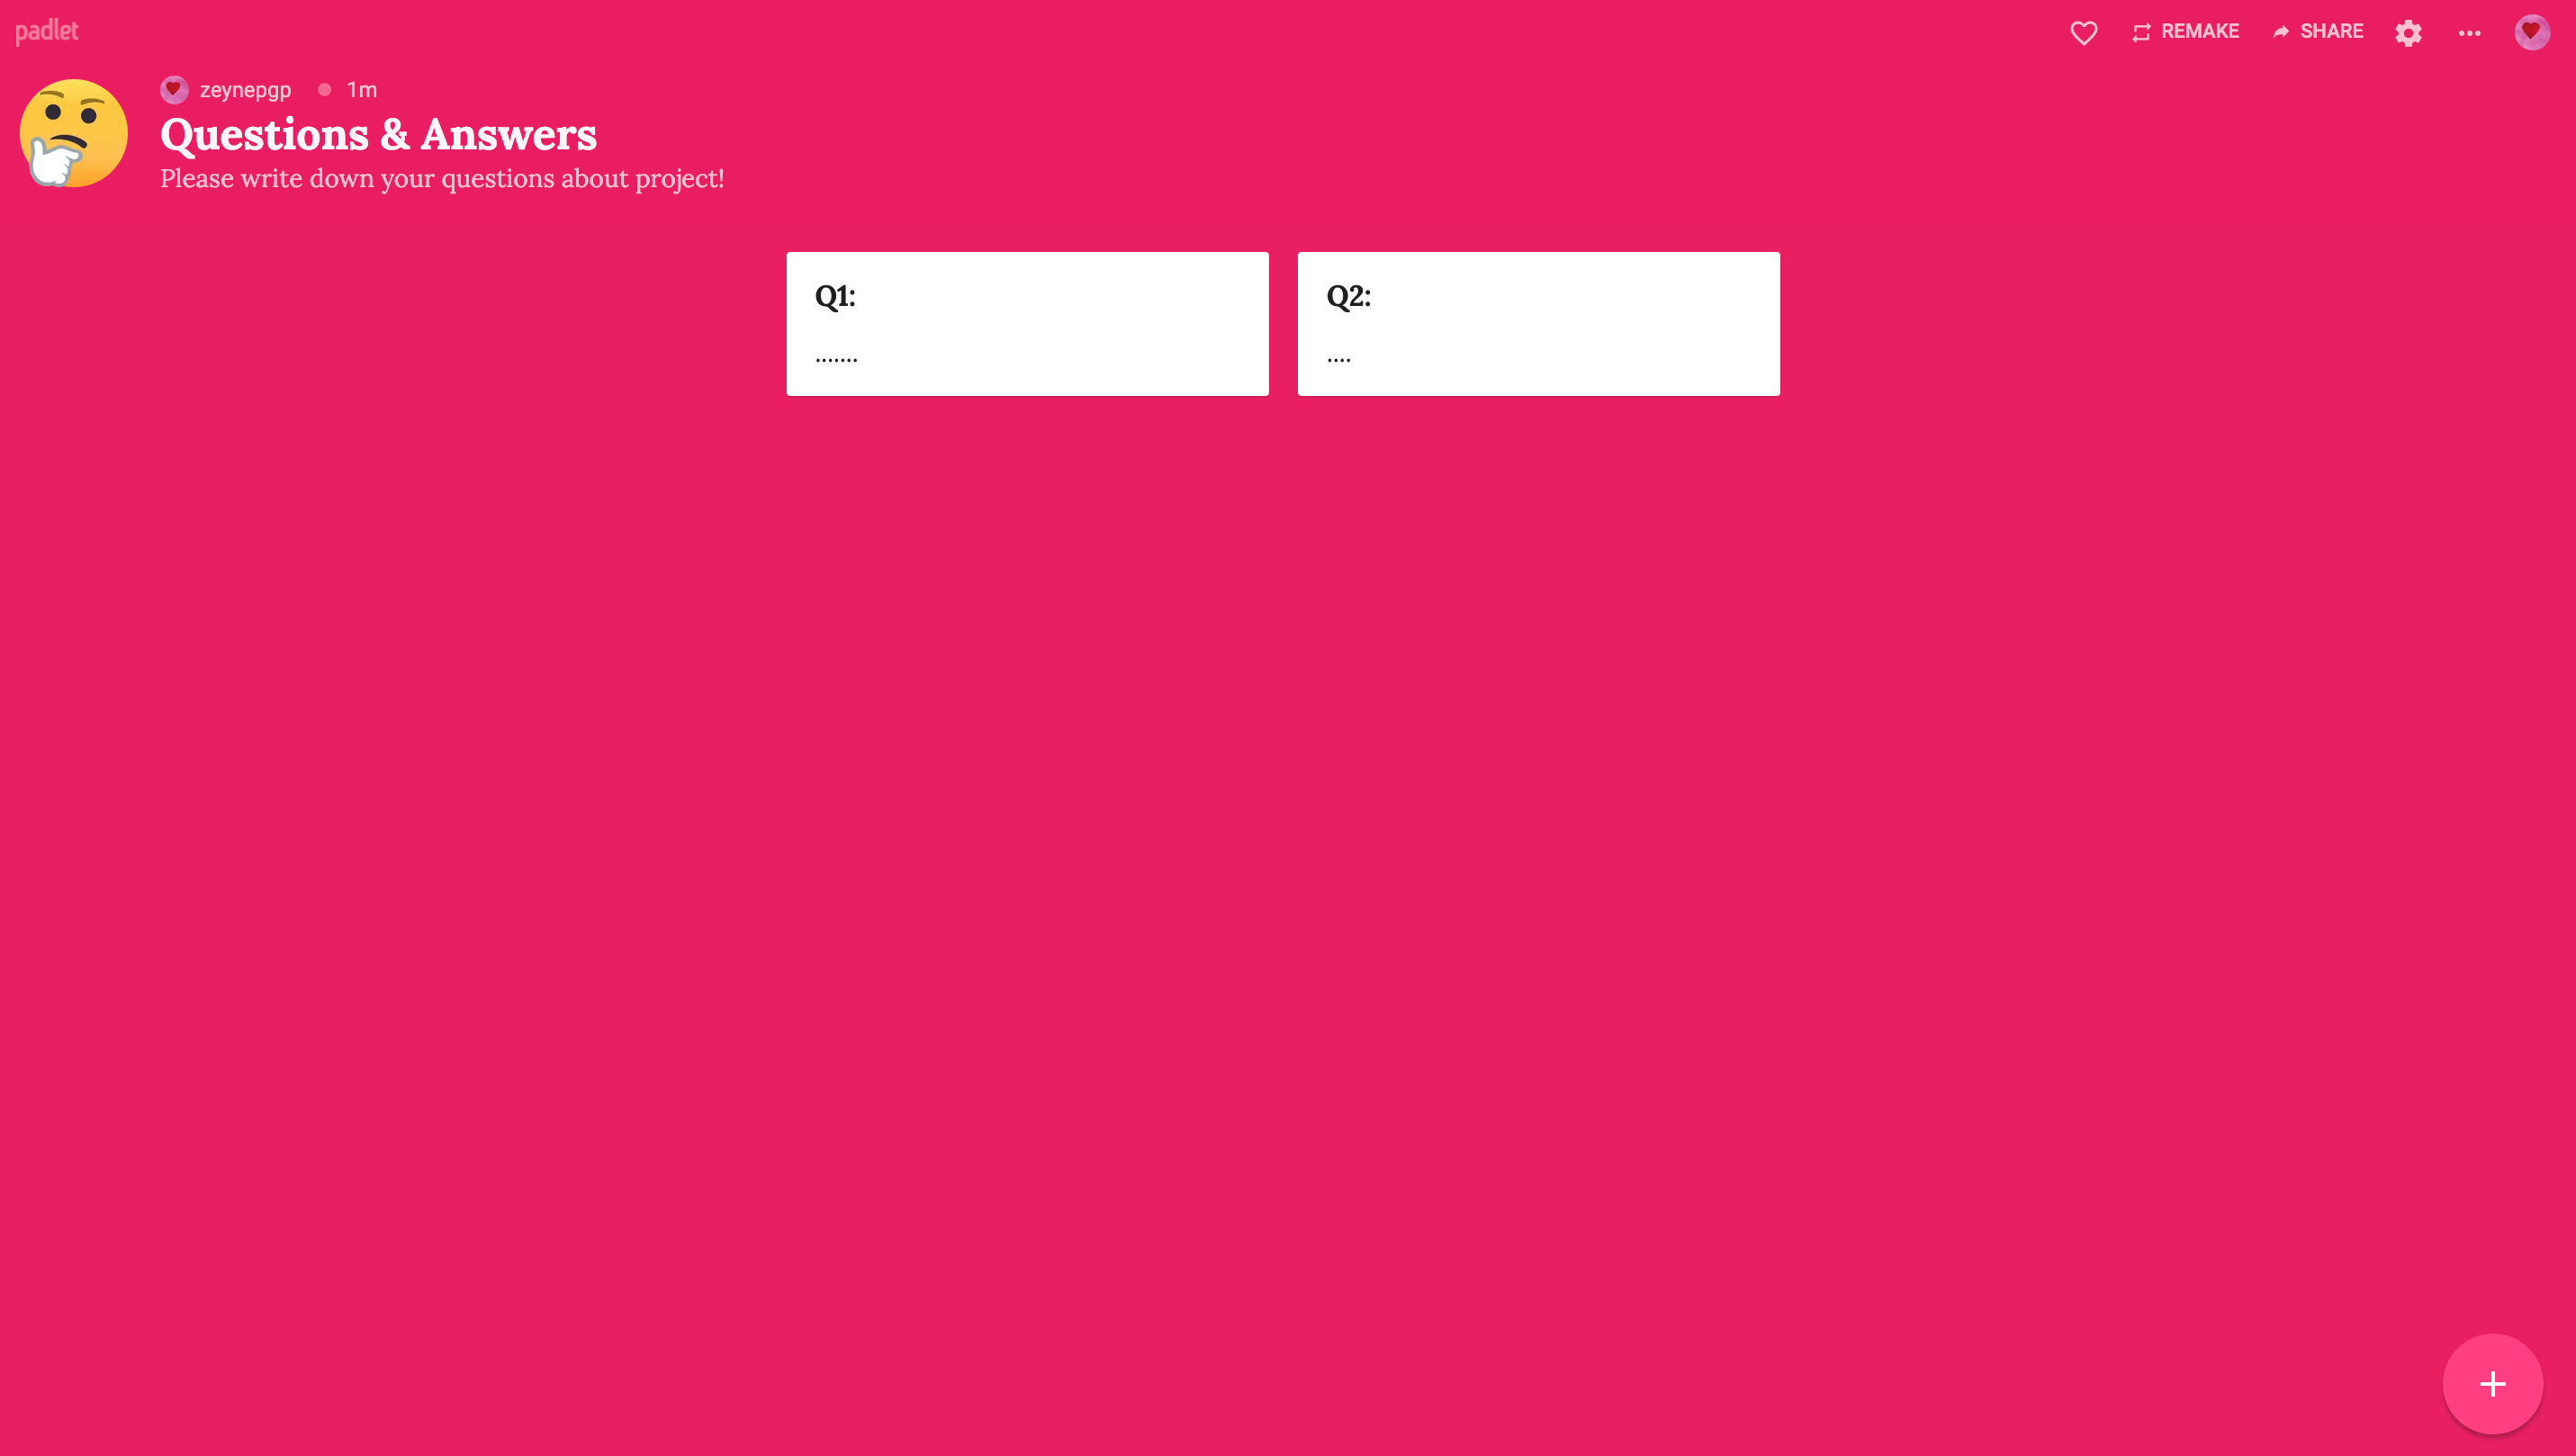
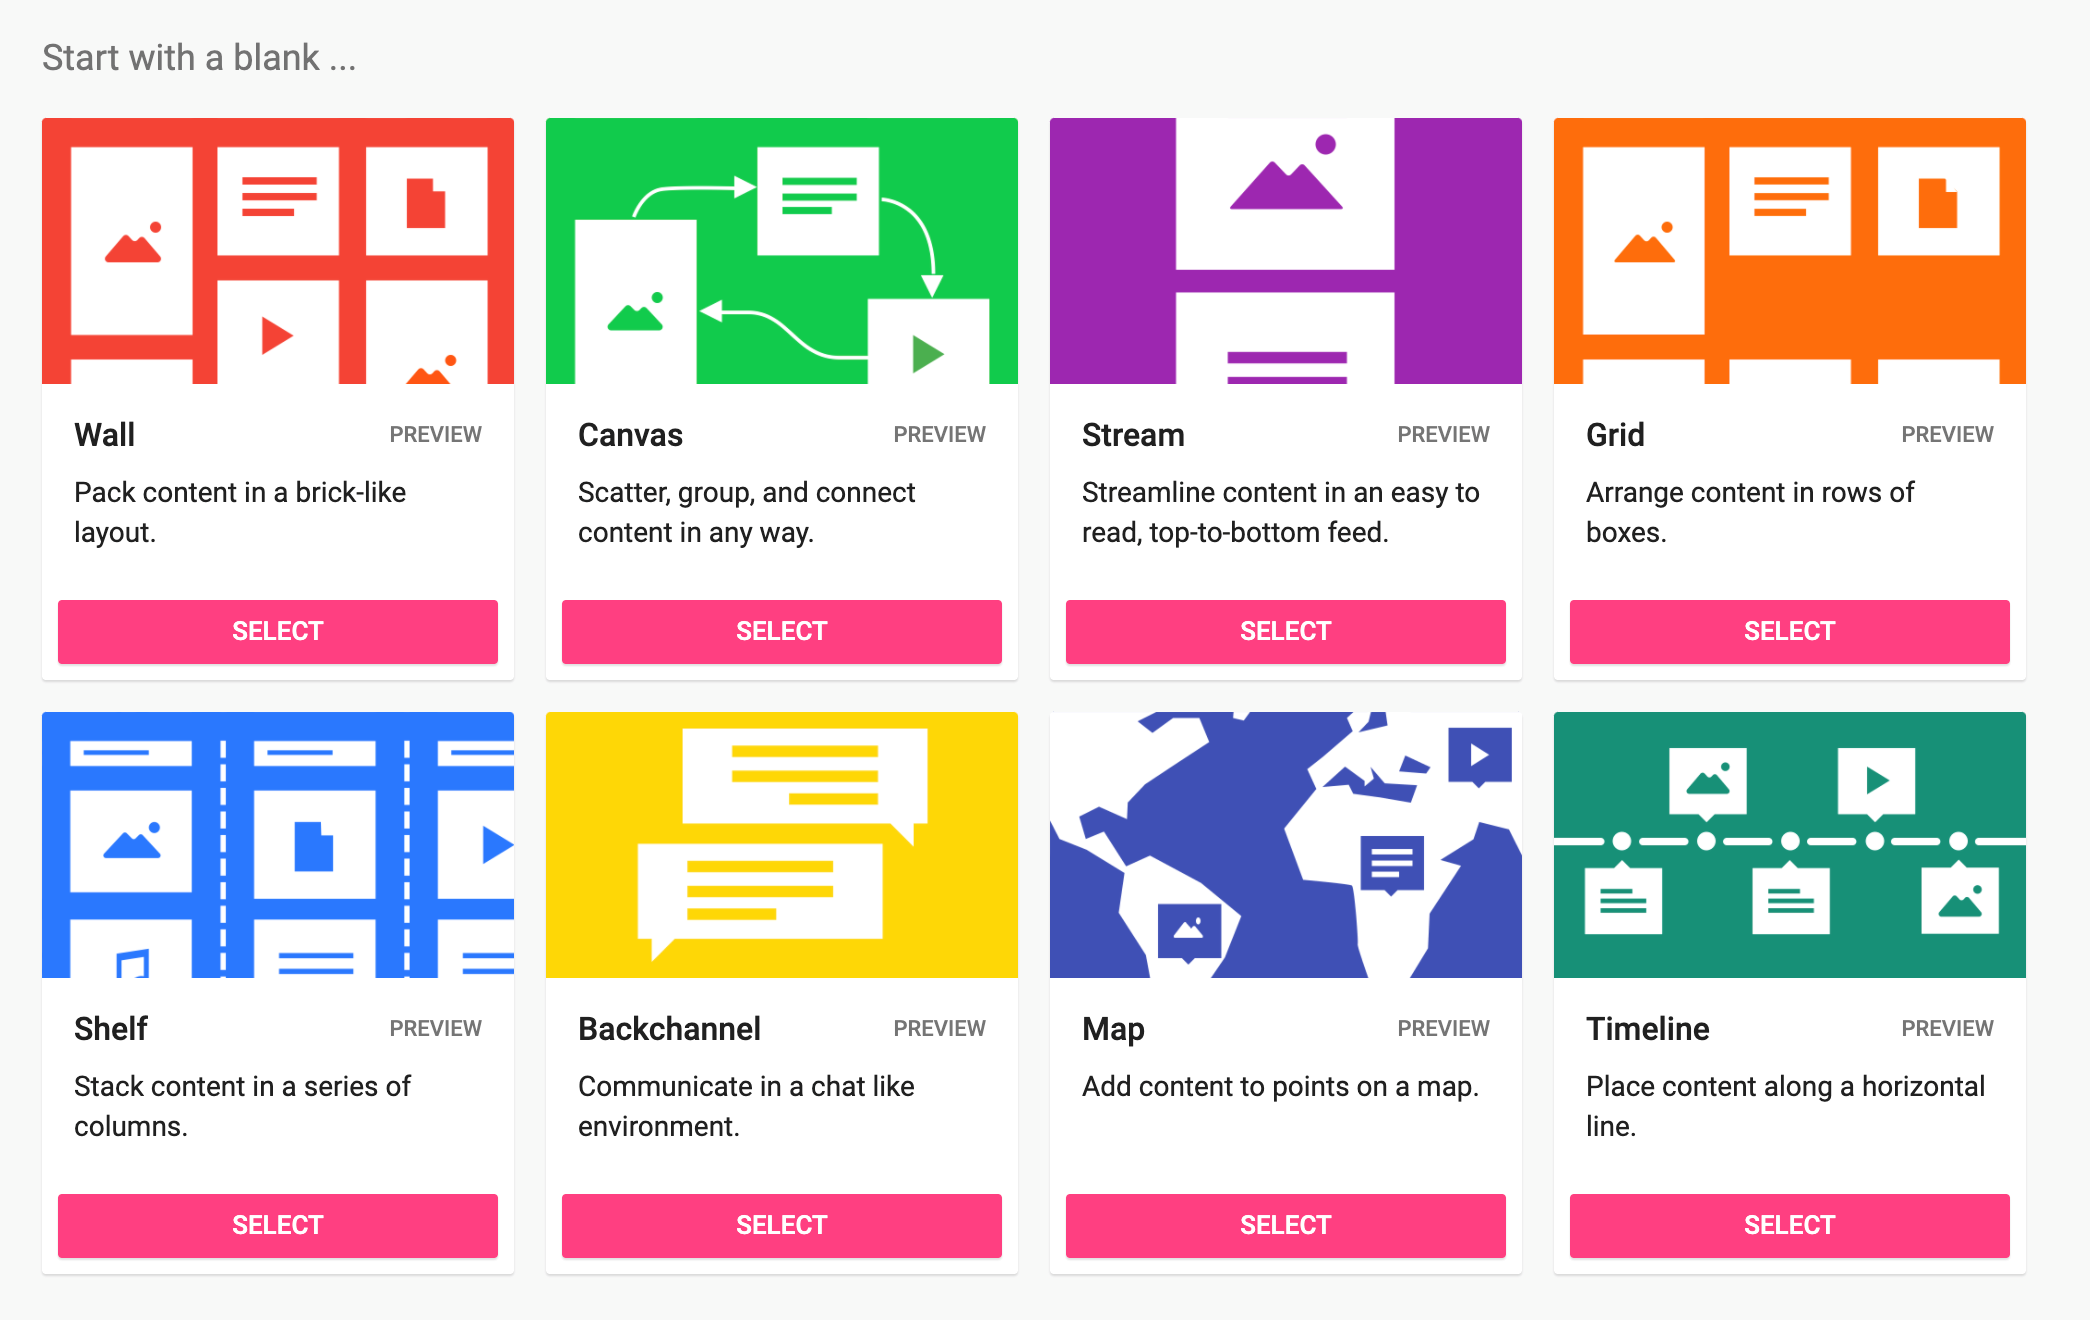
You have eight different options for creating a Padlet. You can use these options for brainstorming on a topic, starting a discussion, creating a student’s portfolio, classroom communication and updates, providing feedback, creating a timeline and/or mindmap, interactive storytelling, warm-up activities, presenting a poster, and more! For example, using the Padlet Canvas template can allow you to move posts around and make connections between posts, which could be useful for grouping two- and three-dimensional shapes or for brainstorming! To create a Q&A space, consider allowing students to post anonymously so they are more motivated to share and ask questions.
Furthermore, you can use Padlet walls as educational storage by uploading your lesson materials. You can also share these resources with students, posting them to a Padlet wall and encouraging students to share their own helpful resources with classmates. Another practical way to use Padlet is for group activities. Students can work collaboratively on projects, and after finishing them, can use Padlet to exhibit them to their teacher, peers, or parents.
In this blog, we shared some basic ideas about Padlet and how to use it. Padlet provides many features for different subject areas and grade levels. To create a more interactive learning environment, visit the site and play around to see how you can create dynamic online boards for your lessons!
![]() by Jennifer Robb
by Jennifer Robb
CoSpaces Edu is a virtual platform that enables you to create and code animations, stories, games, and a variety of other experiences which can then be viewed in augmented reality (AR), virtual reality (VR), or as a 360º experience in your browser window. Like other design and coding applications (e.g., Scratch, MakeCode, Tinkercad), CoSpaces is flexible enough that it can be tailored to almost any age and integrated with any STEAM subject area. Here’s a quick glance at the kinds of things you can do with CoSpaces Edu:
CoSpaces definitely fits the “low floor, high ceiling, wide walls” criteria (Papert, 1980; Resnick, 2017) that we use to evaluate digital maker tools. It has a low floor that it’s easy to get started with, even for younger learners who might only be ready to create three-dimensional (3D) stories and experiences. Its high ceiling comes in the form of coding; specifically, the options for both block-based (CoBlocks) and syntax-based (TypeScript) programming. Even using CoSpaces’ block-coding language, learners have the option to select “Beginner CoBlocks” or “Advanced CoBlocks” to change the number and type of code blocks they have access to. This can prevent beginner coders from becoming overwhelmed by advanced coding concepts. CoSpaces’ physics engine also contributes to its high ceiling, enabling learners to create sophisticated physics simulations, experiment with collisions, and more! Finally, its wide walls are evident in its flexibility; not only can CoSpaces be used to create almost any kind of virtual experience, students can create their own 3D models in a tool like Tinkercad or SketchUp, record their own musical scores, add pre-recorded videos, and so much more.
As with any 3D design environment, we personally recommend using CoSpaces Edu on a laptop or desktop computer with a mouse, if possible. While the controls are sensitive enough to be executed without too much difficulty on a touchscreen or laptop touchpad, a separate computer mouse provides more control over any small or precise movements you might wish to make! On that point, if you have limited experience working in 3D design environments, CoSpaces’ advanced translation and rotation tools (pictured below) can be tricky to learn. But, with some time and practice, you and your students will be masters at manipulating objects in three dimensions!
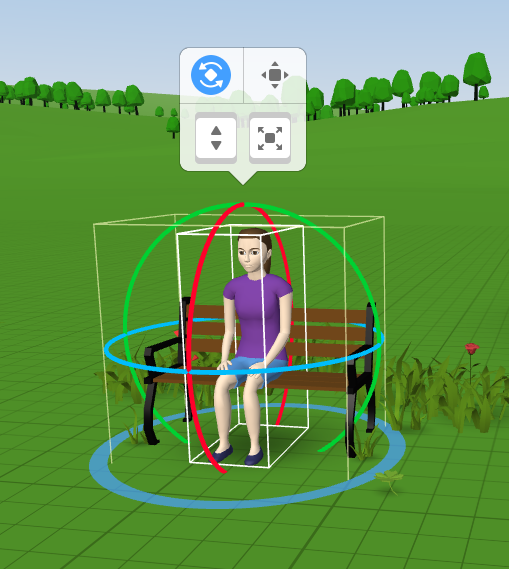

Creating student accounts for CoSpaces Edu.
To start working with your students in CoSpaces Edu, you will first need to create a Teacher Account at this link. Once you’re logged in, click on Classes in the sidebar, and then on + Create Class. Choose a name for your class, click create, and you will be provided with a 5-character class code that students will enter when they create student accounts.
At the time of writing, CoSpaces does require each student to have their own account. These are most easily created using the appropriate sign-in partner (Microsoft, Google, Apple) for students’ school-issued email accounts to avoid creating another password for students to remember. However, they do also provide the option to create accounts with a name, username, and password, which you could anonymize and document as needed. If students already have a CoSpaces account, they can simply click on Classes in the sidebar, and then click on Join Class where they will enter your unique class code.
Once your CoSpaces Class is up and running, you can add assignments as you wish! If you are using the free version of CoSpaces you are limited to one assignment at a time; however, any level of the pro version removes this limit. As the teacher, you are able to view (and edit) students’ work in real time, providing valuable opportunities for formative assessment and troubleshooting.
You also control whether students are able to generate a Share link to their CoSpace. Note, however, that students’ names will appear with their shared CoSpaces. To maintain students’ privacy, you may wish to instead copy students’ work to your personal CoSpaces account and generate a share link from there, adding as much of students’ information to the project as is appropriate.
Another valuable resource for teachers is the CoSpaces Gallery. Not only can these  publicly-shared CoSpaces be a source of inspiration for projects you might assign yourself, many Gallery projects can be remixed and and used as an assignment starter for students. To do this:
 now see the project you made a copy of.
Now you’re ready to jump into the deep end with CoSpaces Edu. We’d love to see what you and your students create! Make sure to tag us (@steam3dmakerlab) in your social media posts, or message us directly with any questions we can help answer. Happy making!
![]() by Zeynep Gecu-Parmaksiz
by Zeynep Gecu-Parmaksiz
ClassDojo is a communication platform that can be used to create an informative and collaborative learning environment with students, teachers, and parents. It can also function as a digital student portfolio that teachers, students, and families can access throughout the school year, and is easy for all users to navigate.
In order to use ClassDojo, an account will need to be created by choosing the proper user type. If you create a profile as a teacher, by clicking into your Settings, you can manage your profile, password, school, class, language, region, or comments settings. Students can use ClassDojo with their school-provided email accounts, or by logging into ClassDojo with a QR code or text code. 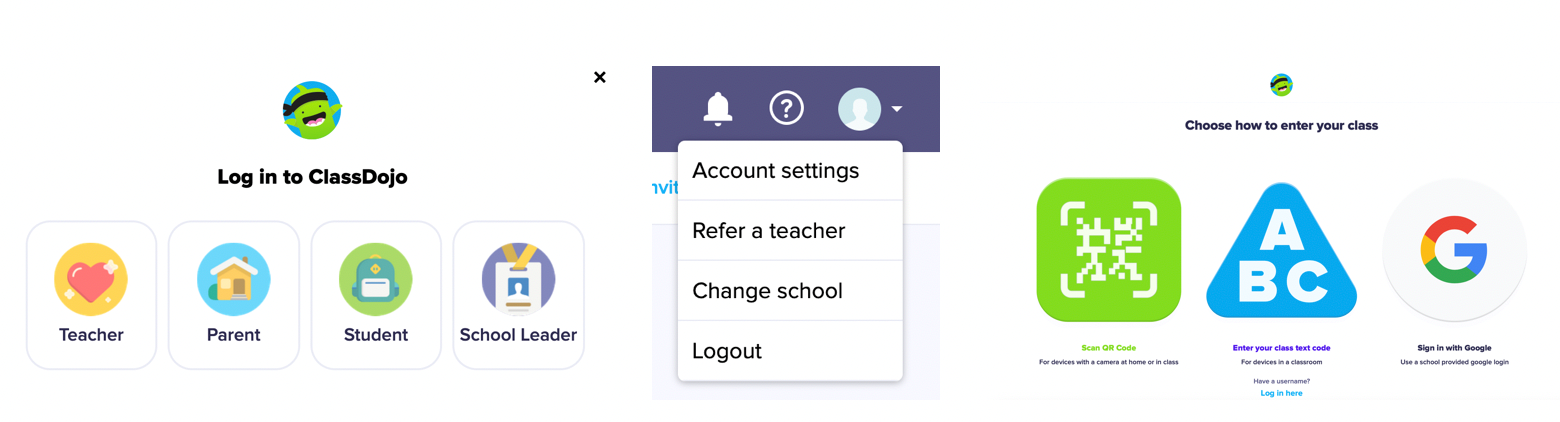 Once you have created a teacher account, the next step is to create a new class. After that, you can fill out your virtual teaching environment by adding students’ names, forming groups, inviting families, and assigning activities. While creating activities, teachers can specify acceptable response types, including text, video, photo, drawing, or a worksheet file. Moreover, teachers can add video for presenting the instructions for students.
 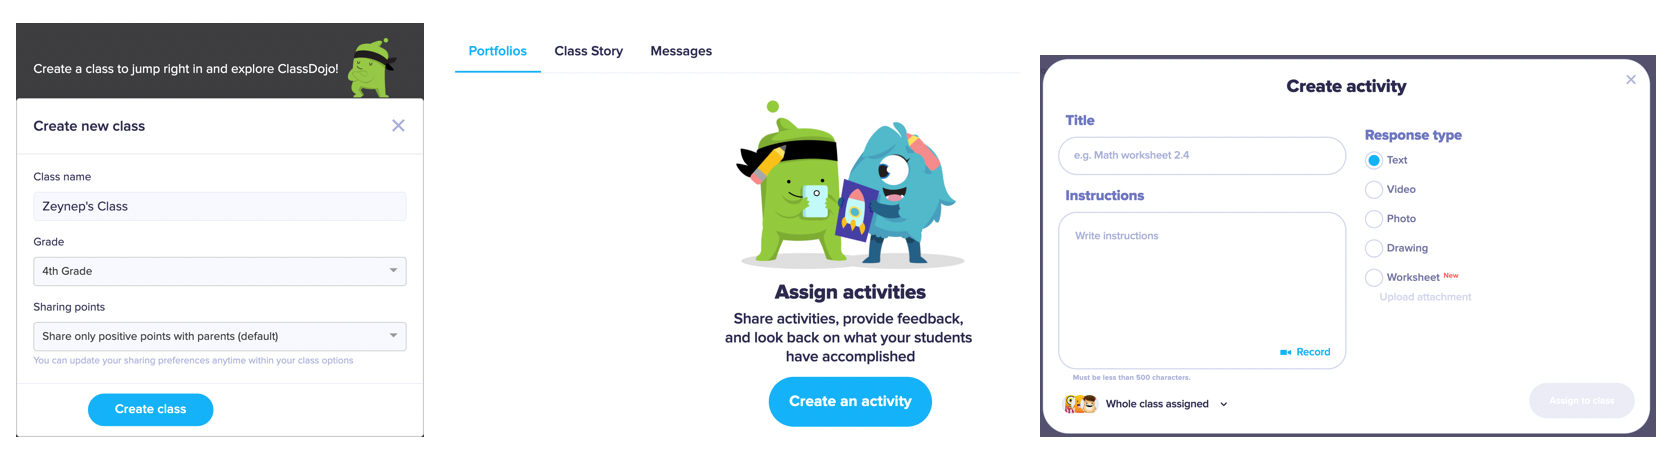 After students scan the code given by their teachers, they can join their virtual classroom and complete their assignments by writing text, taking photos, recording themselves working or speaking, or drawing, and then sending it to their teacher after completing their work.
 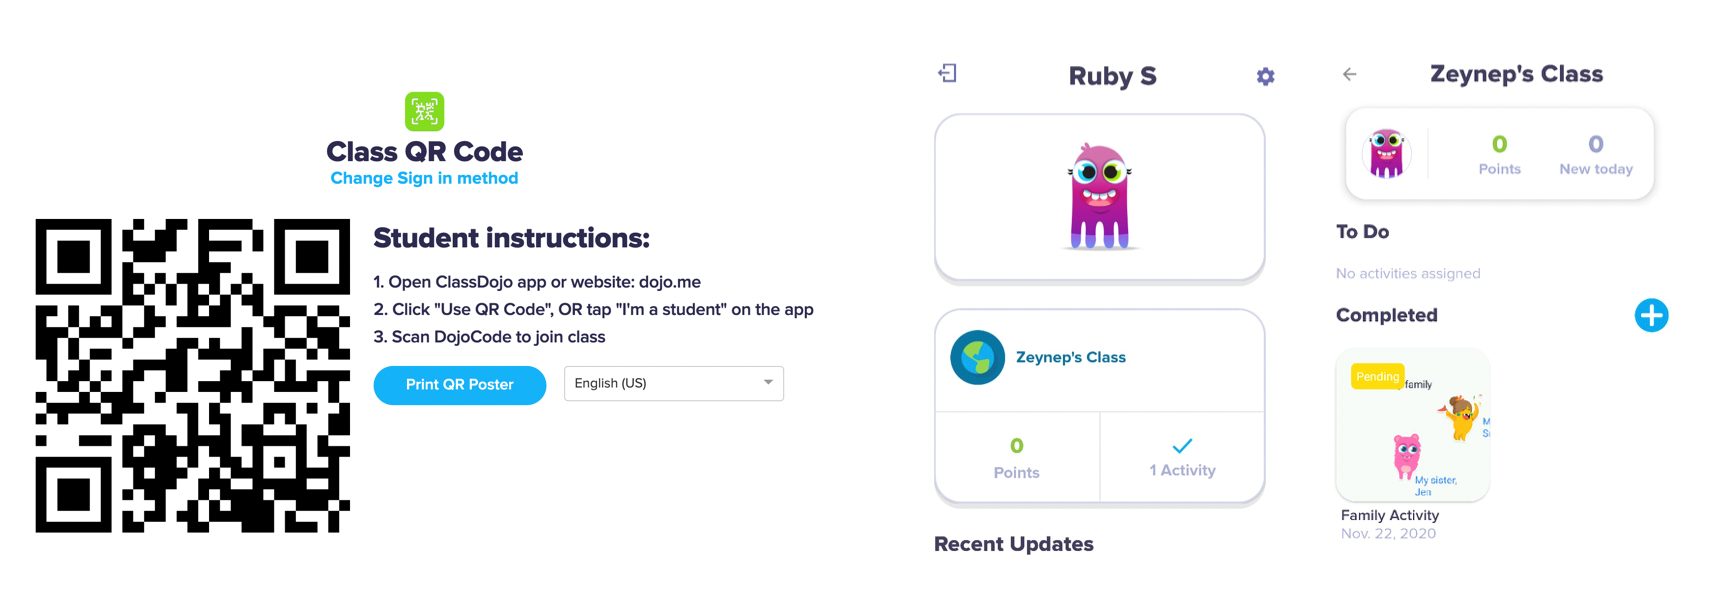 When students have completed their assigned work, the teacher will receive a notification. They can then give feedback and make comments on each portfolio item, and after their approval, these items will be shared with the student and their family.
 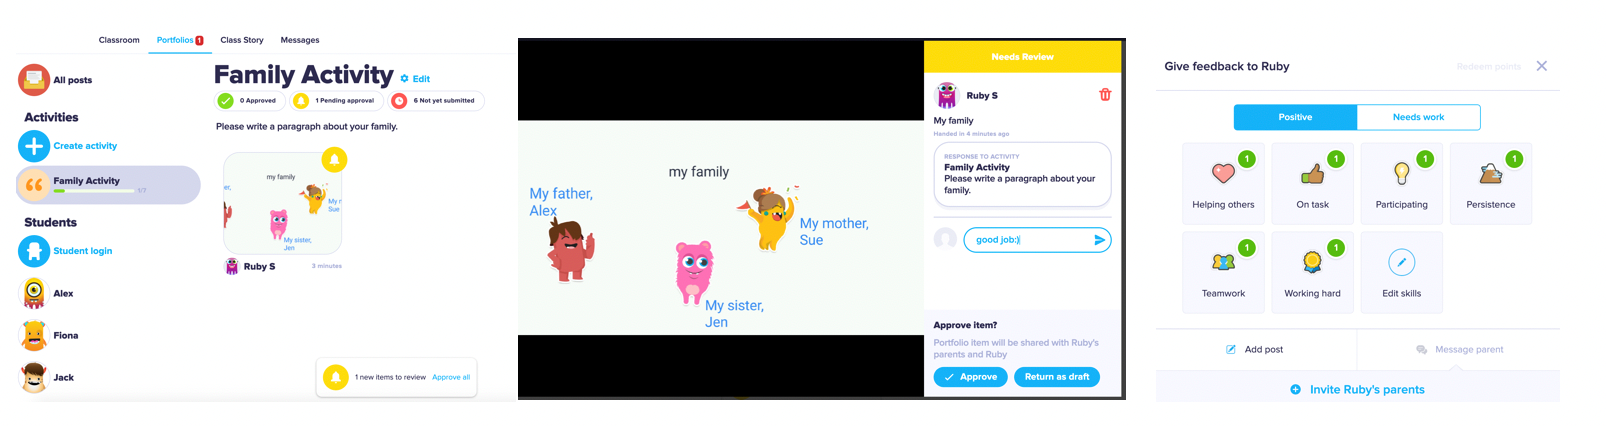 Activities can be assigned to the whole class or to individual students. For example, teachers can assign different activities to meet students’ various needs. Furthermore, ClassDojo provides extra features such as tracking attendance, a work timer, a toolkit for creating student groups, the ability to share Big Ideas, background music, providing classroom directions, and more, making it an excellent tool for classroom management in addition to consolidating work and maintaining communication with students’ families.
  Teachers can send messages to students’ families through the ClassDojo application. In this way, parents receive personalized communication and more frequent updates about their kids. Moreover, teachers can create a Class Story to share classroom moments, photos, and other updates with parents.
ClassDojo is a free platform for teachers, schools and families, and it does not permit third-party advertisers. The ClassDojo website also provides training opportunities and support resources for users looking to get started!
ClassDojo is an incredible tool for connecting students, teachers, and families by creating an enjoyable and engaging learning environment. Are you already using ClassDojo or another similar tool? Let us know!
![]() by Zeynep Gecu-Parmaksiz
by Zeynep Gecu-Parmaksiz
Nearpod is a dynamic student engagement platform that makes every lesson interactive. It provides engaging activities with the help of virtual reality, simulations, slideshows, audio and video. As a teacher, you can embed your favourite documents (.ppt, .pdf, Google Slides, media, or videos directly from YouTube) and questions directly into videos. Nearpod also allows teachers to assess their students with polls, open-ended questions, draw-its, and more. To drive student engagement, teachers can benefit from the library of pre-made lessons and videos, using the original version as-is or customizing to meet desired standards.
Nearpod provides several different teaching modes. Live Participation mode gives 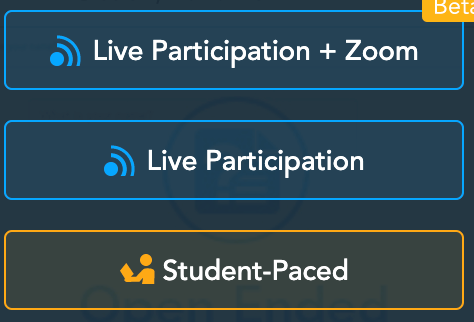 control of the pace to the teacher, and students are invited to join the class either in-person or remotely. Student-Paced Mode provides the opportunity for students to study asynchronously, at any time from anywhere.
Teachers can use many of Nearpod’s features without upgrading their accounts. Nearpod has several features that can help create an interactive learning environment. After logging in, a Nearpod teacher can find pre-created lessons by filtering based on grade or subject area. After adding a pre-created lesson to your library, you can edit and customize it to meet students’ needs before assigning it to your class.
As a teacher, creating a lesson on Nearpod is quick and easy! This tool supports numerous file formats, enabling you to build an interactive lesson on material you already have. By clicking on Upload Files, almost any content can be added from your computer, Google Drive, Dropbox, Box, or OneDrive.
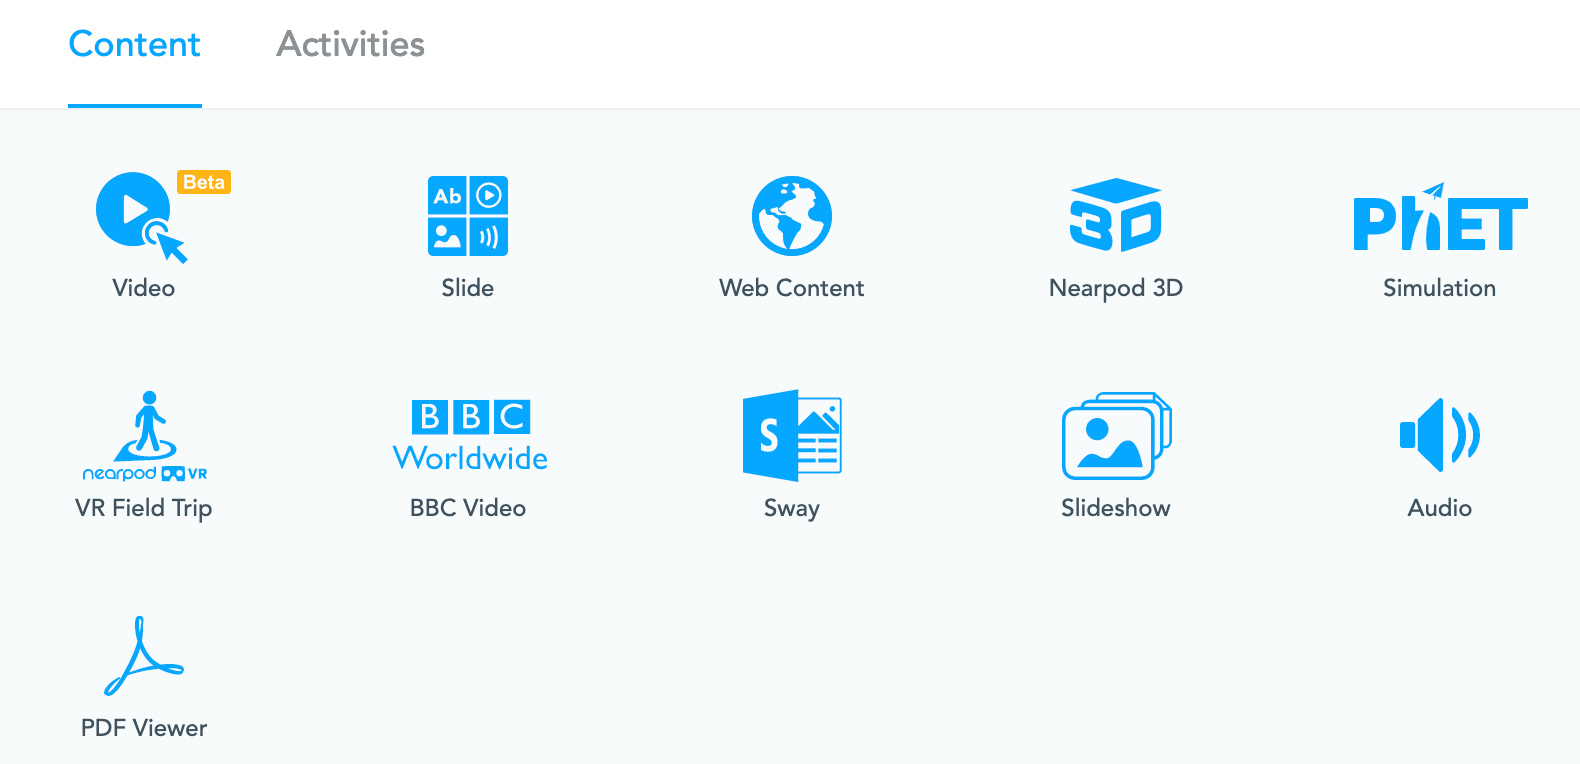 There are interactive collaboration boards, simulations, slides, polls, open-ended questions, and quiz options to create dynamic lessons for students. You also have the option to add a timer to various Nearpod activities.
 Once the lesson has been created, students can join using a specific code or link. Students
 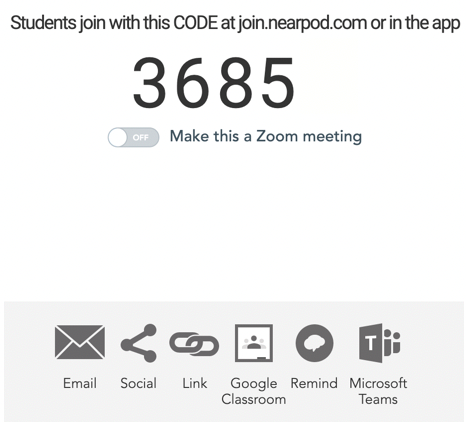 do not need to have their own account; they can join the lesson with just their name! Nearpod also allows teachers to share their lessons with students on both Microsoft and Google platforms. The teacher can send students a link through Google Classroom, Microsoft Teams, Remind, and more.
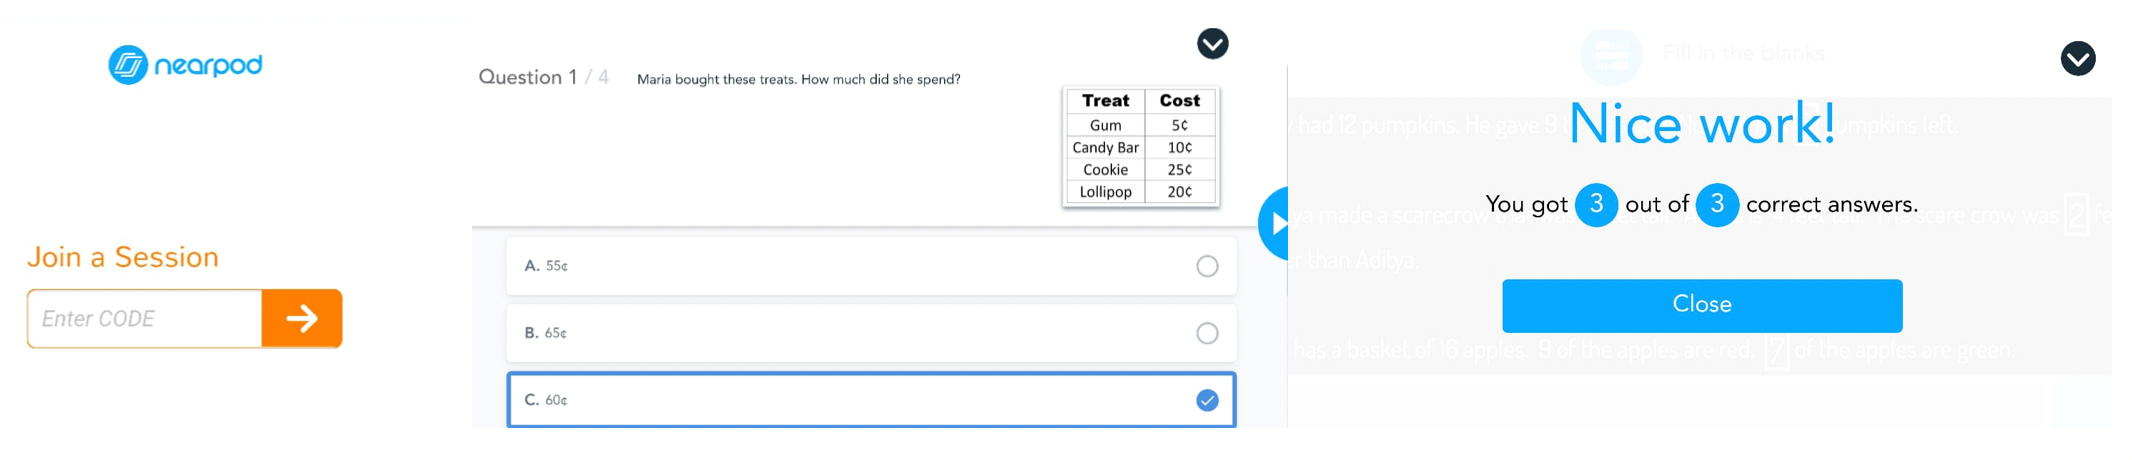
During Live Participation mode, the presentation is controlled by the teacher. Students can see content and interact with activities when the teacher advances the slides. Moreover, as a teacher, you can see how many students have replied to the questions or engaged with the activities through the reports. To see how Nearpod looks from both the teacher’s and student’s perspective, click to enlarge the images below.

Overall, Nearpod can serve several functions for teachers:
Nearpod provides teachers with lots of opportunities to create an interactive learning environment and make lessons more fun!
![]() by Jennifer Robb
by Jennifer Robb
This year more than ever, educators have relied on digital tools and resources to support their curricular programming. Whether you’re leading a virtual classroom or maintaining physical distance in a face-to-face context, there are countless activities and interactive tools available online that it can be difficult to keep track of them all. Enter Wakelet. Instead of spending hours organizing cluttered Bookmarks folders on your web browser, Wakelet is “a free platform that allows you to curate and organize content to save and share”. It’s like Pinterest, but for educators. You can save videos, articles, images, Tweets, links, other Wakelet collections, and more! And better yet, you can add your own text to better contextualize that resource for yourself or your students. And to make saving resources even easier, Wakelet has a Google Chrome Browser Extension so you can add content to your collections while you browse, never losing another awesome resource again!
Wakelet also provides educators with multiple ways to customize their collections. You  control the visibility of your content by making collections Public (anyone can access), Private (only you can access), or Unlisted (provide a link to those you wish to have access). You also control the appearance of your collections, adding header and background images (that you own, or select from Creative Commons databases built into Wakelet), and customizing the layout of each collection to fit the content. You can also invite others to contribute to a collaborative collection, consolidating all of your team’s resources into one place.
But Wakelet can do so much more than help you organize your resources. Here are a few ideas from the Wakelet Educator Handbook:
And once you’ve created your collections, Wakelet makes it easy to share with your target  audience. Share your content directly to your Google Classroom or Microsoft Teams portal, on social media, with families using the Remind app, or anywhere you can think of using a link or QR code. Wakelet also provides HTML & JavaScript embed code that you can copy-and-paste directly into your classroom website. And while Wakelet is primarily a web-based application, you can also download the mobile versions for both Android and iOS.
Want to see it in action? In honour of Digital Citizenship Week (October 19 – 23, 2020), check out these examples of Wakelets containing digital citizenship resources:
 by Jennifer Robb
Are you interested in text-based coding, but aren’t quite sure where to begin? Google’s Grasshopper uses a game-based approach to teach the fundamentals of JavaScript, one of the world’s most commonly used programming languages. JavaScript has numerous applications, including website development, game creation, robotics, building mobile apps, and more, making it a valuable starting point for anyone learning text-based (i.e., syntax) programming. Grasshopper is a free application, available on both Android and Apple mobile devices, as well as in your web browser.
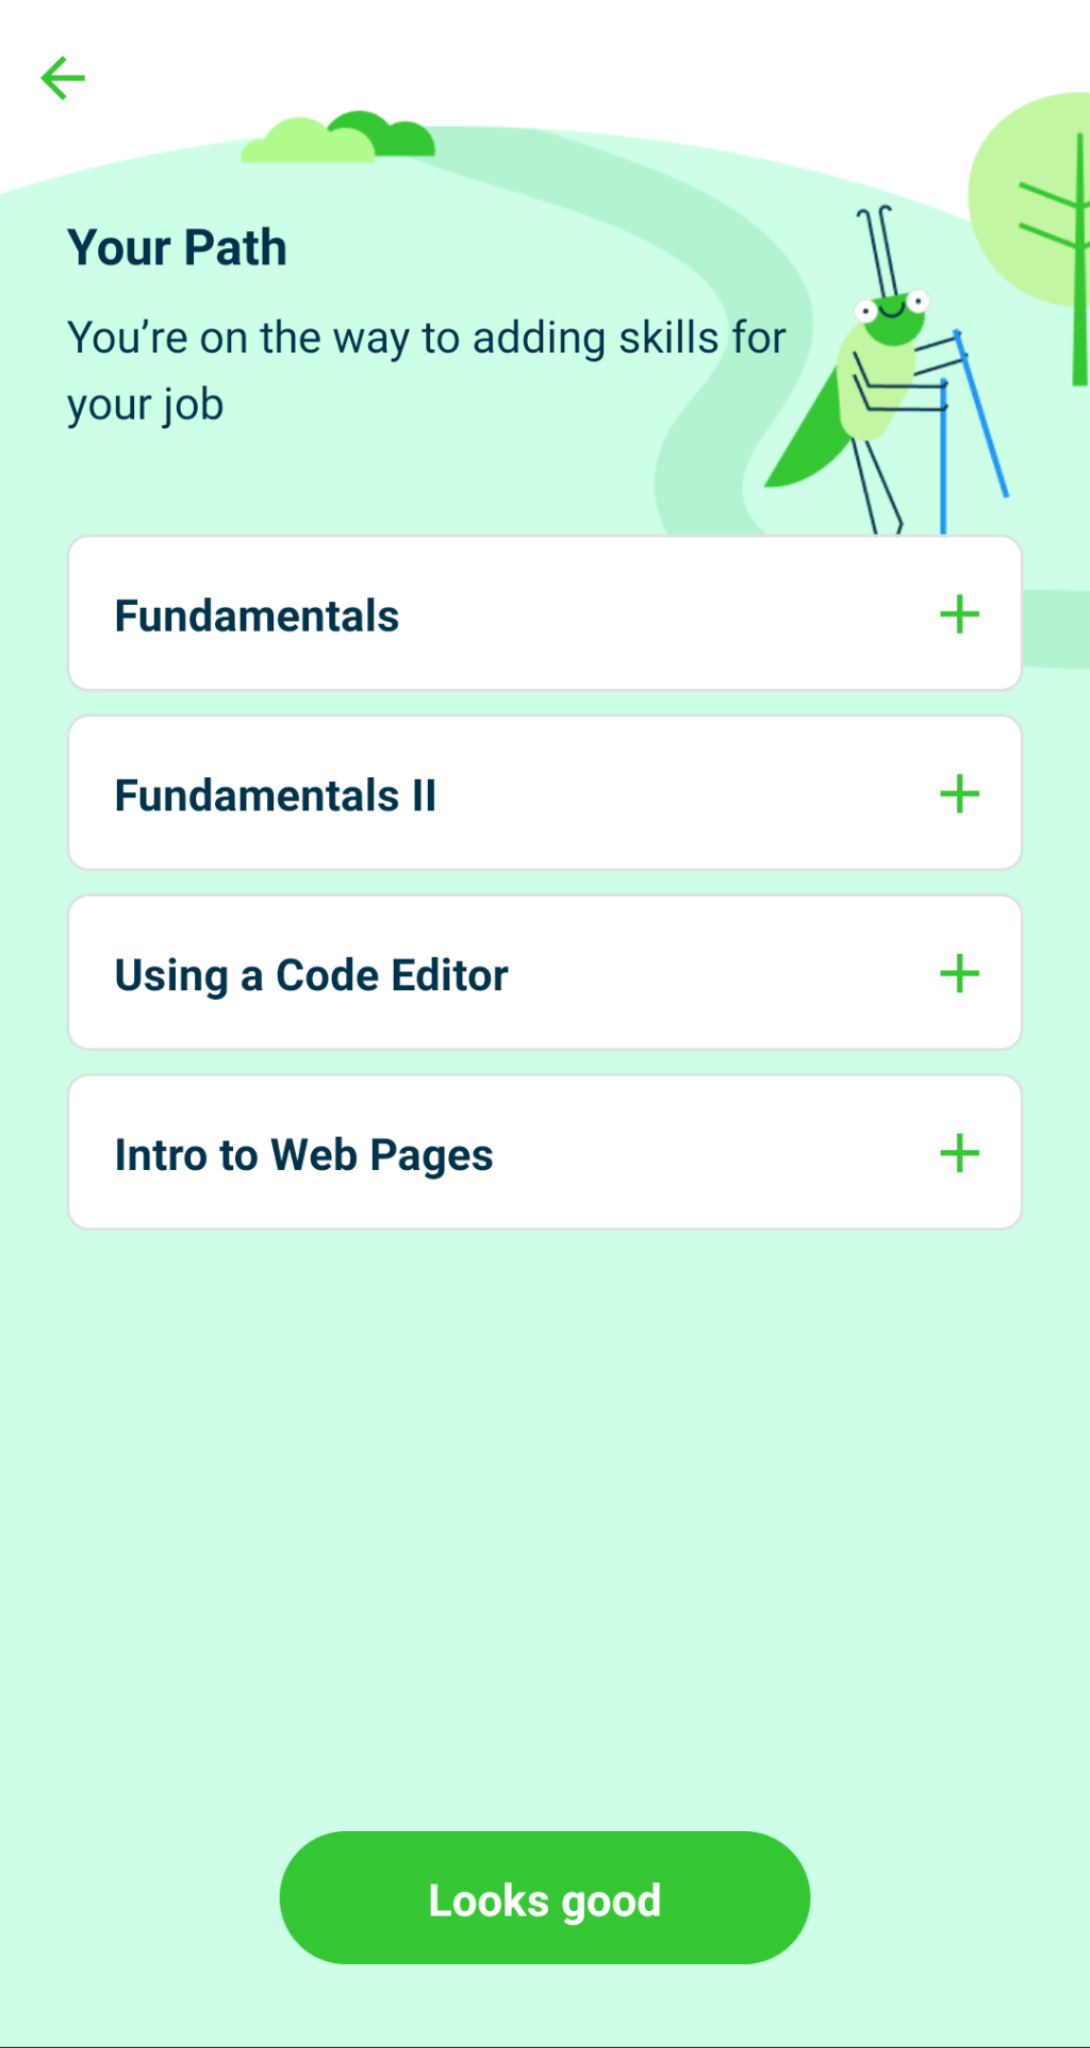
Example series of modules for learning job-related skills.
Grasshopper was intentionally designed to be accessible to coders with a range of programming experience and motivations for learning JavaScript. When opening the app on a mobile device, it asks you a series of questions to gauge your comfort and experience with coding, as well as what you might be looking to do with JavaScript. Depending on your responses, the app curates a series of Modules designed to ease you in to learning JavaScript in ways that align with your interests. For example, the screenshot to the right illustrates the Modules that are available if you choose the “I want to gain skills for my current job” option. Learning just to learn? Select “I’m just curious or I’m not sure yet”, and you’ll be able to go through Grasshopper’s entire selection of JavaScript Modules.
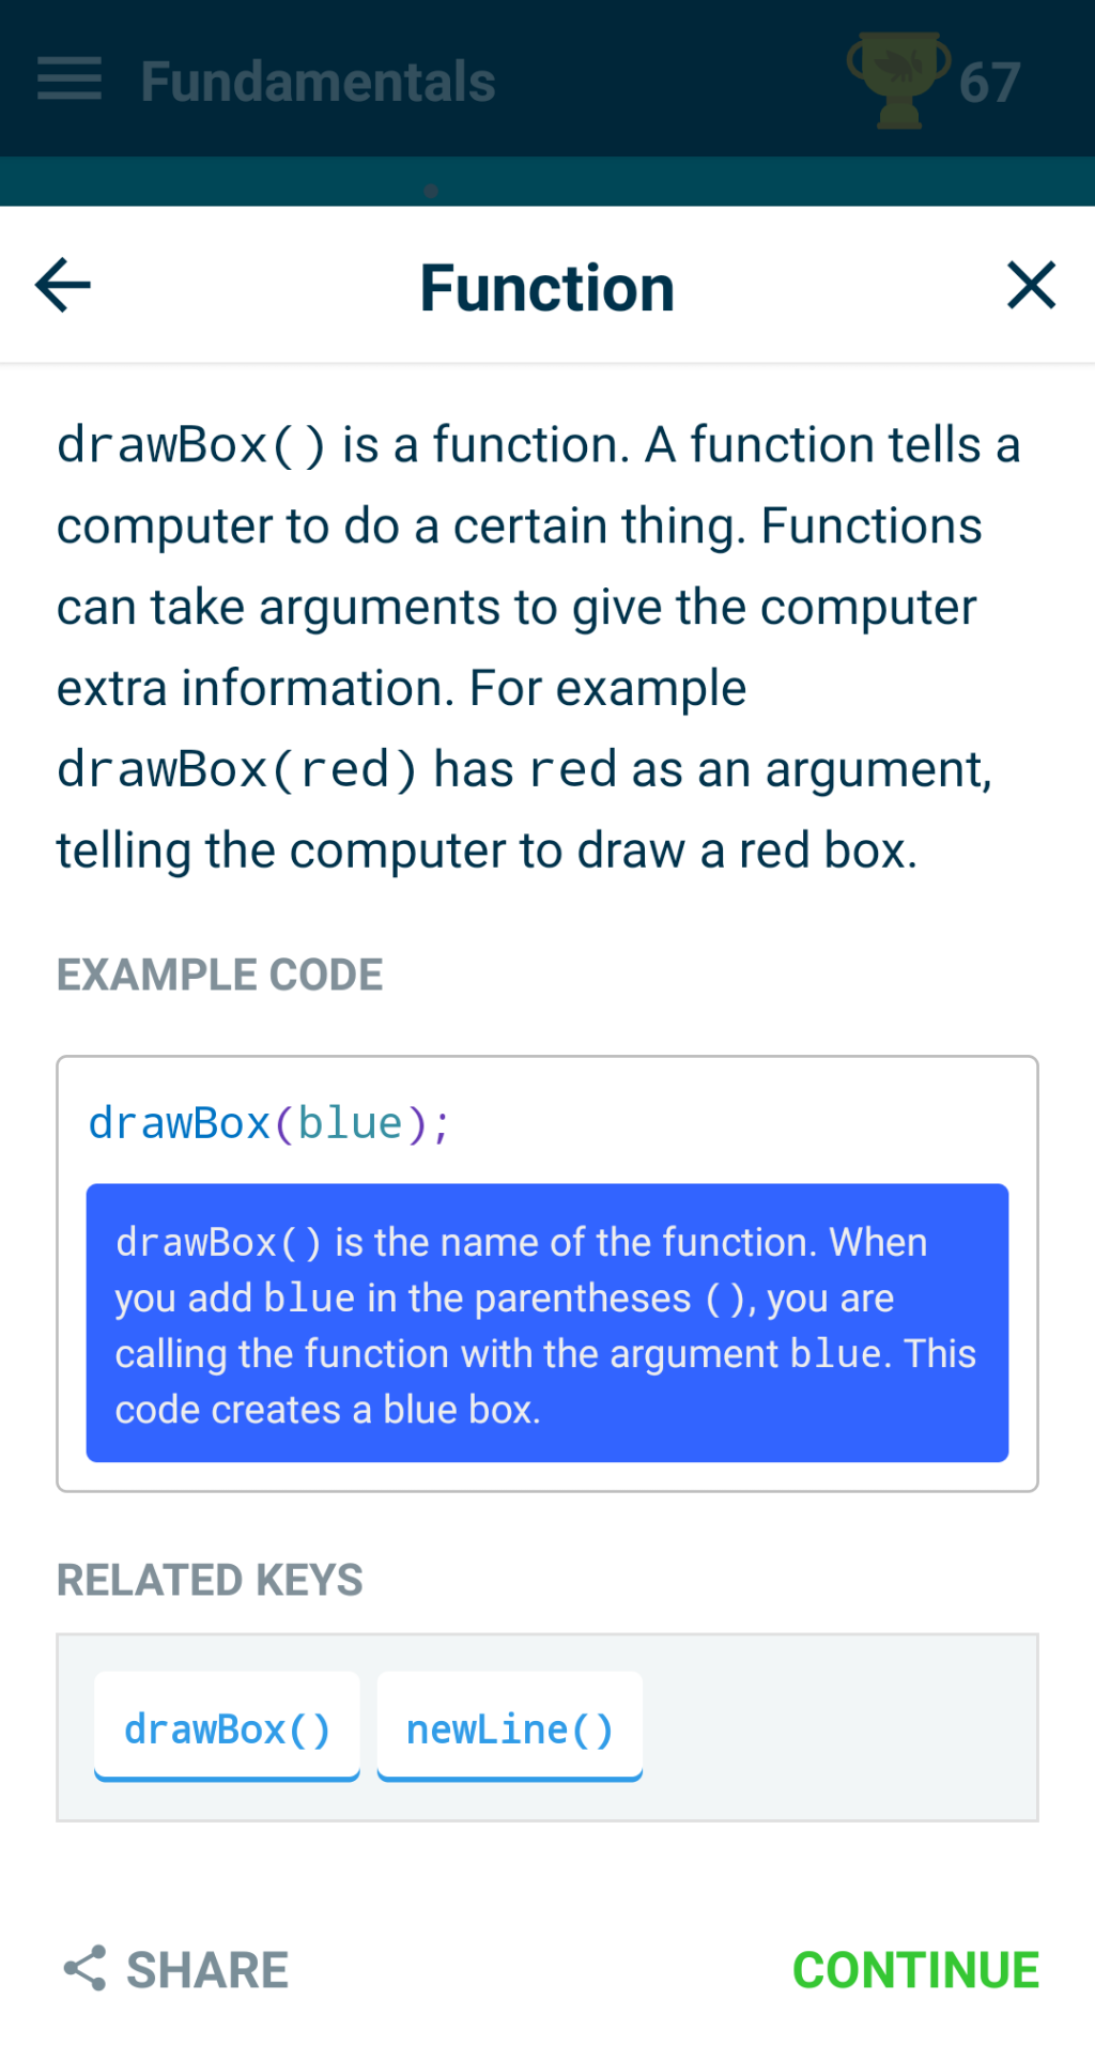
Grasshopper summarizes programming concepts *after* you’ve applied them.
Each Module contains a series of interactive puzzles, multiple-choice questions to apply your understanding, and concept highlights, which provide a brief definition and example of programming concepts as you learn them. These concepts can be revisited at any time by selecting them in the module pathway or by visiting your Grasshopper Dashboard. Although Grasshopper uses a game-based approach to learning, it is by no means easy! Each Module is lengthy and designed for long-term engagement, providing multiple activities per concept to reinforce the user’s understanding of how it could be applied.
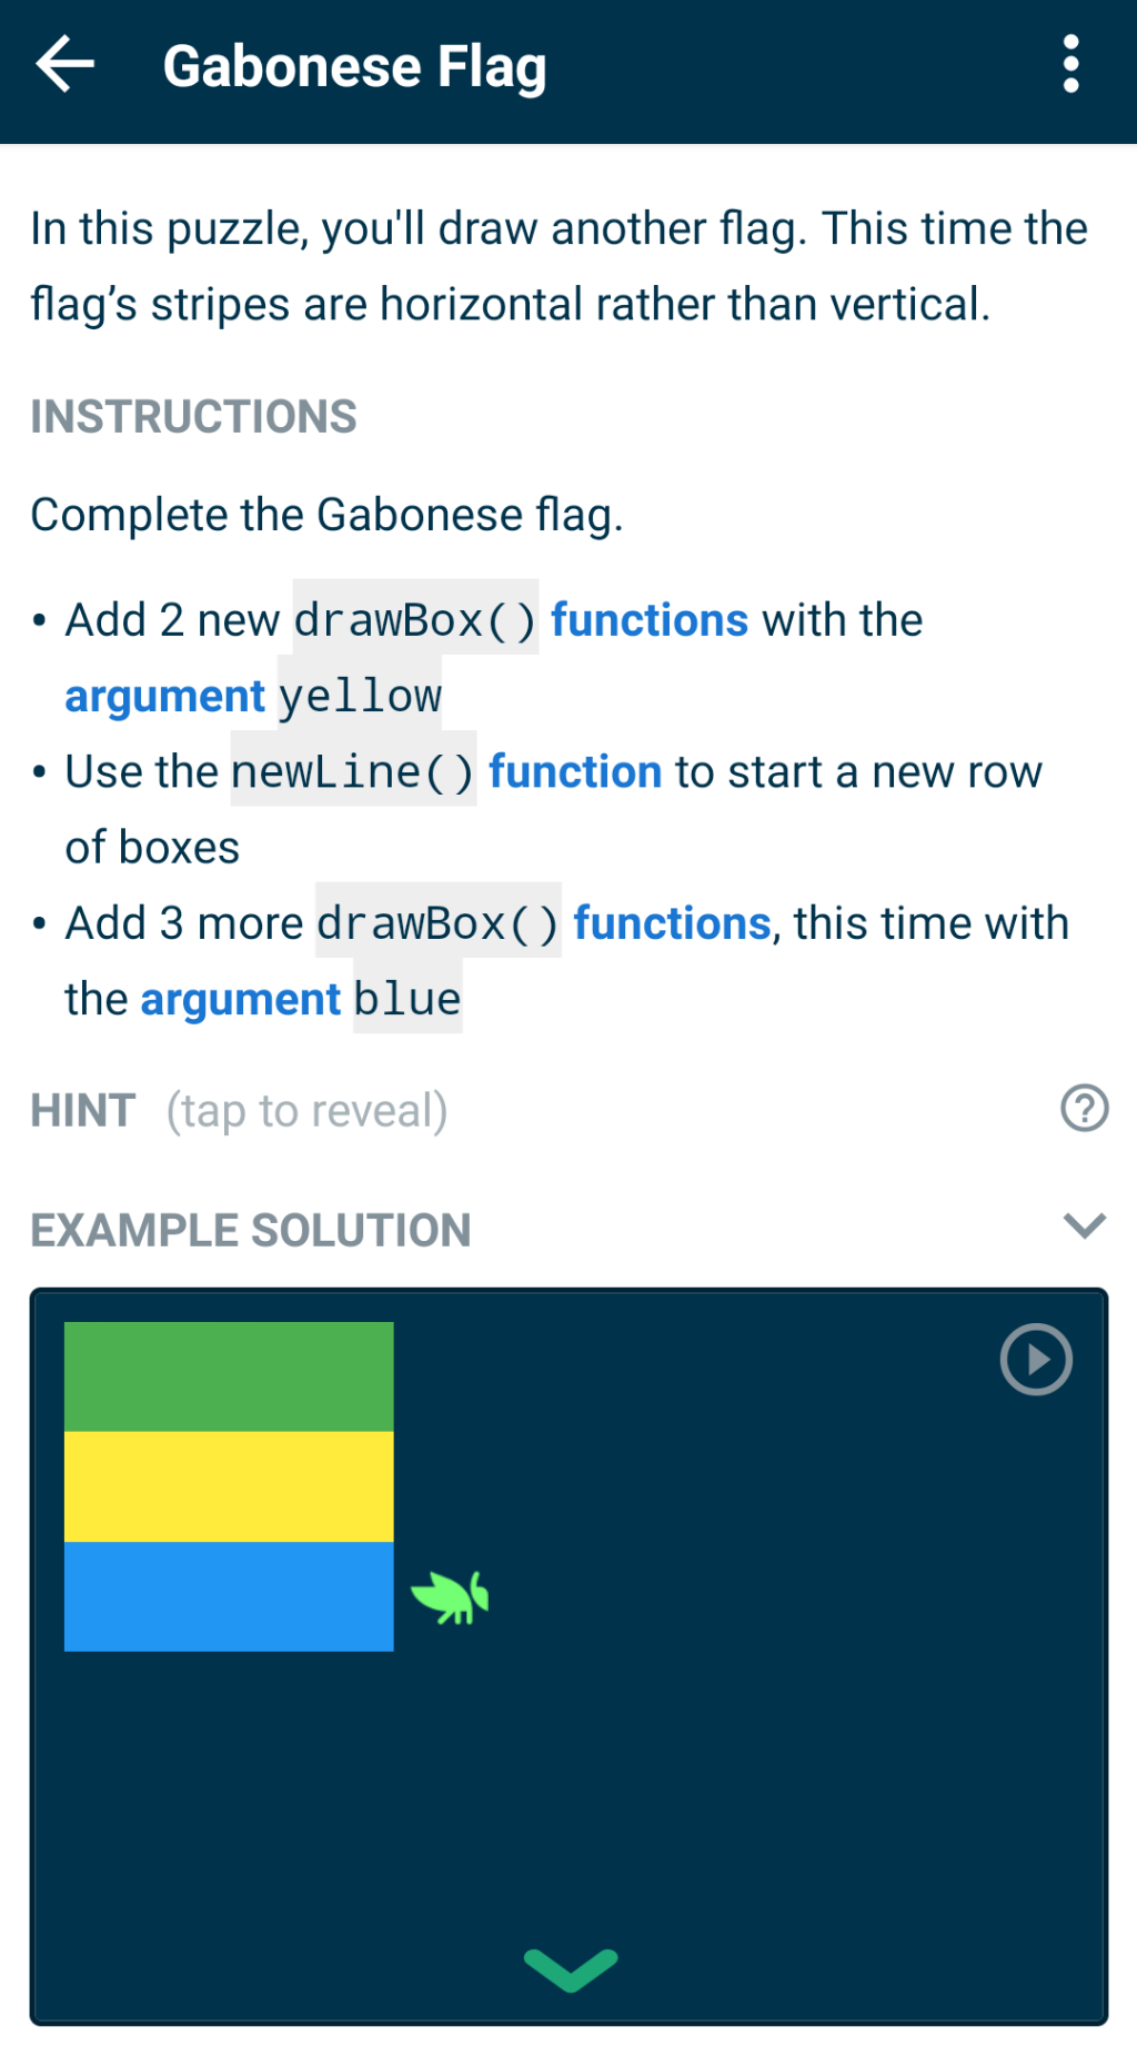
Within the Modules, each puzzle has been carefully constructed to facilitate learner-driven engagement, providing a brief introduction to the concept, instructions for solving the puzzle, a visual representation of the puzzle’s solution, and a coding workspace that allows the user to insert and remove “blocks” of JavaScript code. Hints and a link to the solution are available for learners who are stuck on a given concept, but these must be actively selected by the user, encouraging them to experiment with the code first. See below for an example of one of the early puzzles available in the Fundamentals Module, introducing the user to functions and arguments:
As each Module progresses, learners are introduced to increasingly complex programming concepts and authentic practices, such as increasing the efficiency of your code. And if you’re still craving more of a particular programming concept once you’ve “achieved it” in the Module pathway, navigate to the Practice option in the Grasshopper menu for more examples and puzzles to try. Want to try something outside of your current Module? Grasshopper’s Code Playground allows you tinker with already-existing Code Snippets, or create your own Code Snippet and share it with others!
In addition to the puzzles, Grasshopper has numerous game-based features to  keep learners engaged, including:
Grasshopper also offers certificates of completion as you progress through your JavaScript learning Path, highlighting the programming concepts you’ve learned to date.
There is so much more to this app than is possible to explore in this blog, so download it yourself (Apple, Android) or check out the website and give it a shot! When it comes to digital making, particularly with Primary and Junior divisions, block coding is where we usually start. However, this app makes it easy to learn JavaScript at any age and is well worth checking out.
 by Jennifer Robb
Videos have always been a valuable resource for education, and with so many educators and edutainers producing high quality video content, there’s often no need to reinvent the wheel for our students. However, we still want to know that our students in blended, flipped, or virtual learning contexts are a) watching the videos, and b) learning the salient concepts. EdPuzzle is one way to address that challenge. With EdPuzzle, you can create interactive video lessons in just a few short minutes with their web-based video editor that enables you to:
Not feeling particularly creative? EdPuzzle has a large database of video lessons created by other educators that you can remix to suit your needs, or just use as is!
Raring to create your own? Upload a video from your computer or Google Drive, or use the site’s “Create a video” feature to find your preferred video on YouTube and start making! EdPuzzle even has a Google Chrome browser extension that adds a button beneath videos on YouTube so you  can start editing as soon as you see a video you love! Check out this EdPuzzle playlist for a step-by-step walkthrough to getting started.
Although EdPuzzle’s interactivity can be used to promote engagement or create “choose-your-own-adventure” learning exercises, my favourite application of this technology is for formative assessment. By embedding questions at key points throughout the video, you can easily determine students’ level of understanding as the lesson progresses. Similarly, EdPuzzle’s open-ended question feature can be used to prompt students’ critical thinking and applications of the material they’ve learned. Finally, being able to add hyperlinks into your questions, answers, or as a simple note throughout the video allows you to redirect students to relevant supplementary materials or websites of interest.
You can create up to 20 augmented videos with EdPuzzle’s free educator account. Need more? Premium versions are available for individual teachers or entire school districts that allow for unlimited video creation. Or, you can refer your friends and colleagues and receive storage space for three additional videos for each one that creates an account.
We’d love to see what you create with this tool. Share your awesome maker videos on Twitter with the hashtag #makeON!
by Jennifer Robb
As you could probably guess from our logo, we place particular emphasis on the role of the Arts in STEAM education. While STEM has become a focal point for schools around the world, we argue that the Arts disciplines (which for us include Language Arts in addition to Visual Arts, Dramatic Arts, Music, and Dance) are invaluable for promoting creativity, diverse forms of expression, and a range of entry points for learners who may be underrepresented or otherwise uninterested in traditional STEM subjects. So whenever we encounter a tool that highlights the Arts, we get excited. And this week, we are very excited!
Chrome Music Lab is an innovative series of hands-on, digital experiments from Google that enable students to explore musical concepts in a variety of ways.
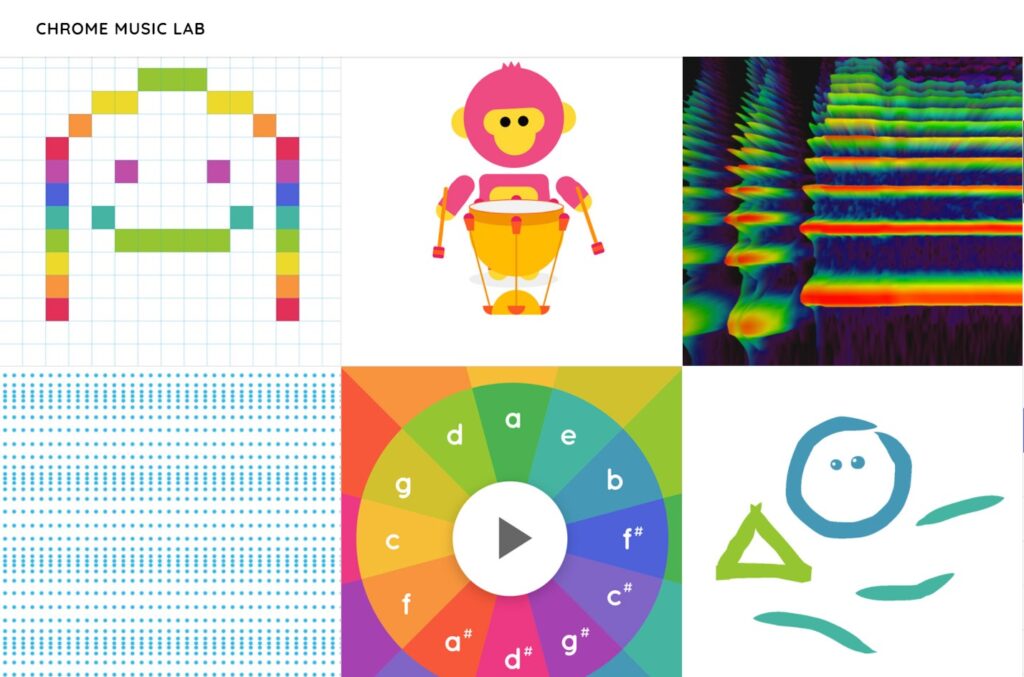 From bite-sized experiments focusing on a single concept (e.g., Rhythm, Sound Waves) to their comprehensive Song Maker that allows students to create, share, and download original compositions, Chrome Music Lab is an incredible tool to facilitate musical inquiry. Better yet, some of these experiments have explicit interdisciplinary connections (e.g., Strings, which highlights the mathematical relationship between the length of an instrument’s string and its pitch), and below the experiment, the developers have highlighted educators who have found cross-curricular applications for the app. For even more ideas, check out the Twitter collection curated by the Chrome Music Lab team of educators putting this awesome tech tool to use!
This web-based application is incredibly minimalistic in design, encouraging students to  dive in and explore the various experiments without much overhead. The decontextualized presentation of each experiment also means that students’ engagement with the tool could consist of anything from independent inquiry to an exploration of specific learning objectives situated within a larger STEAM unit. However you choose to use it, Chrome Music Lab is an awesome way to engage with the science of music!
Can’t wait to get started? Midnight Music offers several lesson prompts for each of the 13 experiments featured on Chrome Music Lab. And if you still want more, check out these ideas from Nexus Education.
We’d love to see what you create with Chrome Music Lab! Use the hashtag #makeON to share your creations with our Virtual PLN or tag us directly (@steam3Dmakerlab)! Happy making!
Within G Suite, Google Forms is a very diversified, free tool that every teacher should have experience using. Having this skill in your tool belt can revolutionize some of the ways that you teach your students. While it may seem very rudimentary in its initial design, there are different ways that you can fully maximize the way both you and your students can use this tool. Three of the main ways that you can use this tool in the classroom is to create entry & exit tickets, create quizzes, and to create anecdotal notes for observations or assessments.
Entry or exit tickets are a great way for gathering quick pieces of information from the class as a check in for understanding. This assessment for learning is very important as it can help drive your instruction throughout the semester/year. By posing a quick question to the class as an exit ticket, you can collect a class worth of student responses that can inform you, the teacher, as to their level of comprehension from this lesson. If the understanding is not at the level you anticipated, then you can restructure the following lessons to help bridge the gaps. Using Google Forms is a great way to go about collecting this information. Simply create a quick, one question form and post the link to the class either through a QR code or by adding the link to a student accessible slide deck. Through your settings you can have the form collect the email addresses of every student who submits the form, this way you can keep track of responses.
Google Forms is a great tool to use as a formative assessment. Due to several updates to the tool, the forms have several key features which allow you to create a fully functioning quiz for students to answer. You can choose from a wide range of questions, such as short answers, multiple choice, or long answer questions.
For schools that use Chromebooks, there is a locked mode which when activated will prevent students from opening other tabs or applications for the duration of the quiz. Additionally, to further deter cheating, there is a shuffle question feature which will shuffle the order of the questions found in the quiz. For questions with a clear defined answer, the form can be set up to give instant feedback and responses to the questions you give. This allows students to gain instant feedback on grades, and to reduce your marking.
I know you are thinking “what is the point of making anecdotal notes using Google Forms?”. It might seem like a crazy idea but trust me, it simplifies the entire process greatly. Using Google Forms you can set up a form to track classroom observations and assessment data on a mobile device (i.e. a tablet or smartphone). Thanks to the ability to submit files within Google Forms, teachers have the capability to capture conversations, images, and videos, while keeping their assessment data neatly organized inside the form.
Why is it a great idea?
All you will need to start setting up your Google Form for anecdotal notes is a class list organized alphabetically, and a list of subjects, strands, and expectations that you can organize the data by. By using drop down menus and long answer question boxes, you can create a form that allows you to select specific students, expectations, and fill in commentary of how they did or did not meet the expectation. For more information regarding how to set up the form, click the links below!
There are so many amazing ways that you can use Google Forms in the classroom, so it is definitely a tool educators should explore and integrate into their daily classroom routine.
 by Devin Flynn (writing & research)
MakeCode is a free, online coding platform which allows for creative, engaging learning experiences. Designed by Microsoft, this open source platform supports students on a progression path into real-world programming. This learning platform brings computer science to life for all students with fun projects, immediate results, and both block and text editors for all low floor to high ceiling learning.
MakeCode allows students to engage in a multitude of different coding experiences through micro:bit, Circuit Playground, Minecraft, Arcade, and many others. One of the large benefits of using MakeCode is that it starts with block based coding which makes it easy for younger students and first time learners to understand. When learners are ready to progress to the next level, they can move into a fully integrated JavaScript editor that includes code snippets, tooltips, and error detection to help guide them.
MakeCode functions in both the physical classroom and the virtual classroom. With both micro:bit and Circuit Playground Express, there are online simulators built into the coding space of MakeCode, which will instantly display the function of the coding sequence. This will allow students to understand the function of coding without having the physical micro:bit or Circuit Playground Express on hand. For an entirely online experience, Microsoft has designed a complete course for an Introduction to Computer Science with MakeCode for Minecraft. This 10 lesson course targets students in grades 6-8, and is designed for teachers who m ay have never taught computer science before. An activity such as this will build students’ understanding of coding gradually, and allow them to pull everything together for one final project, allowing various assessment opportunities.
 by Devin Flynn (writing & research)
micro:bit is an open source hardware that was designed by BBC in partnership with many companies including Microsoft. It functions as a mini-programmable computer that can be coded on a computer, and uploaded to the micro:bit to perform various tasks. It was created to introduce computer education into UK classrooms, making it an easy tool for students to learn and code. It provides opportunities for young students to be introduced to coding, and gain hands-on experience with both coding itself, and the functionality of coding in the modern world. 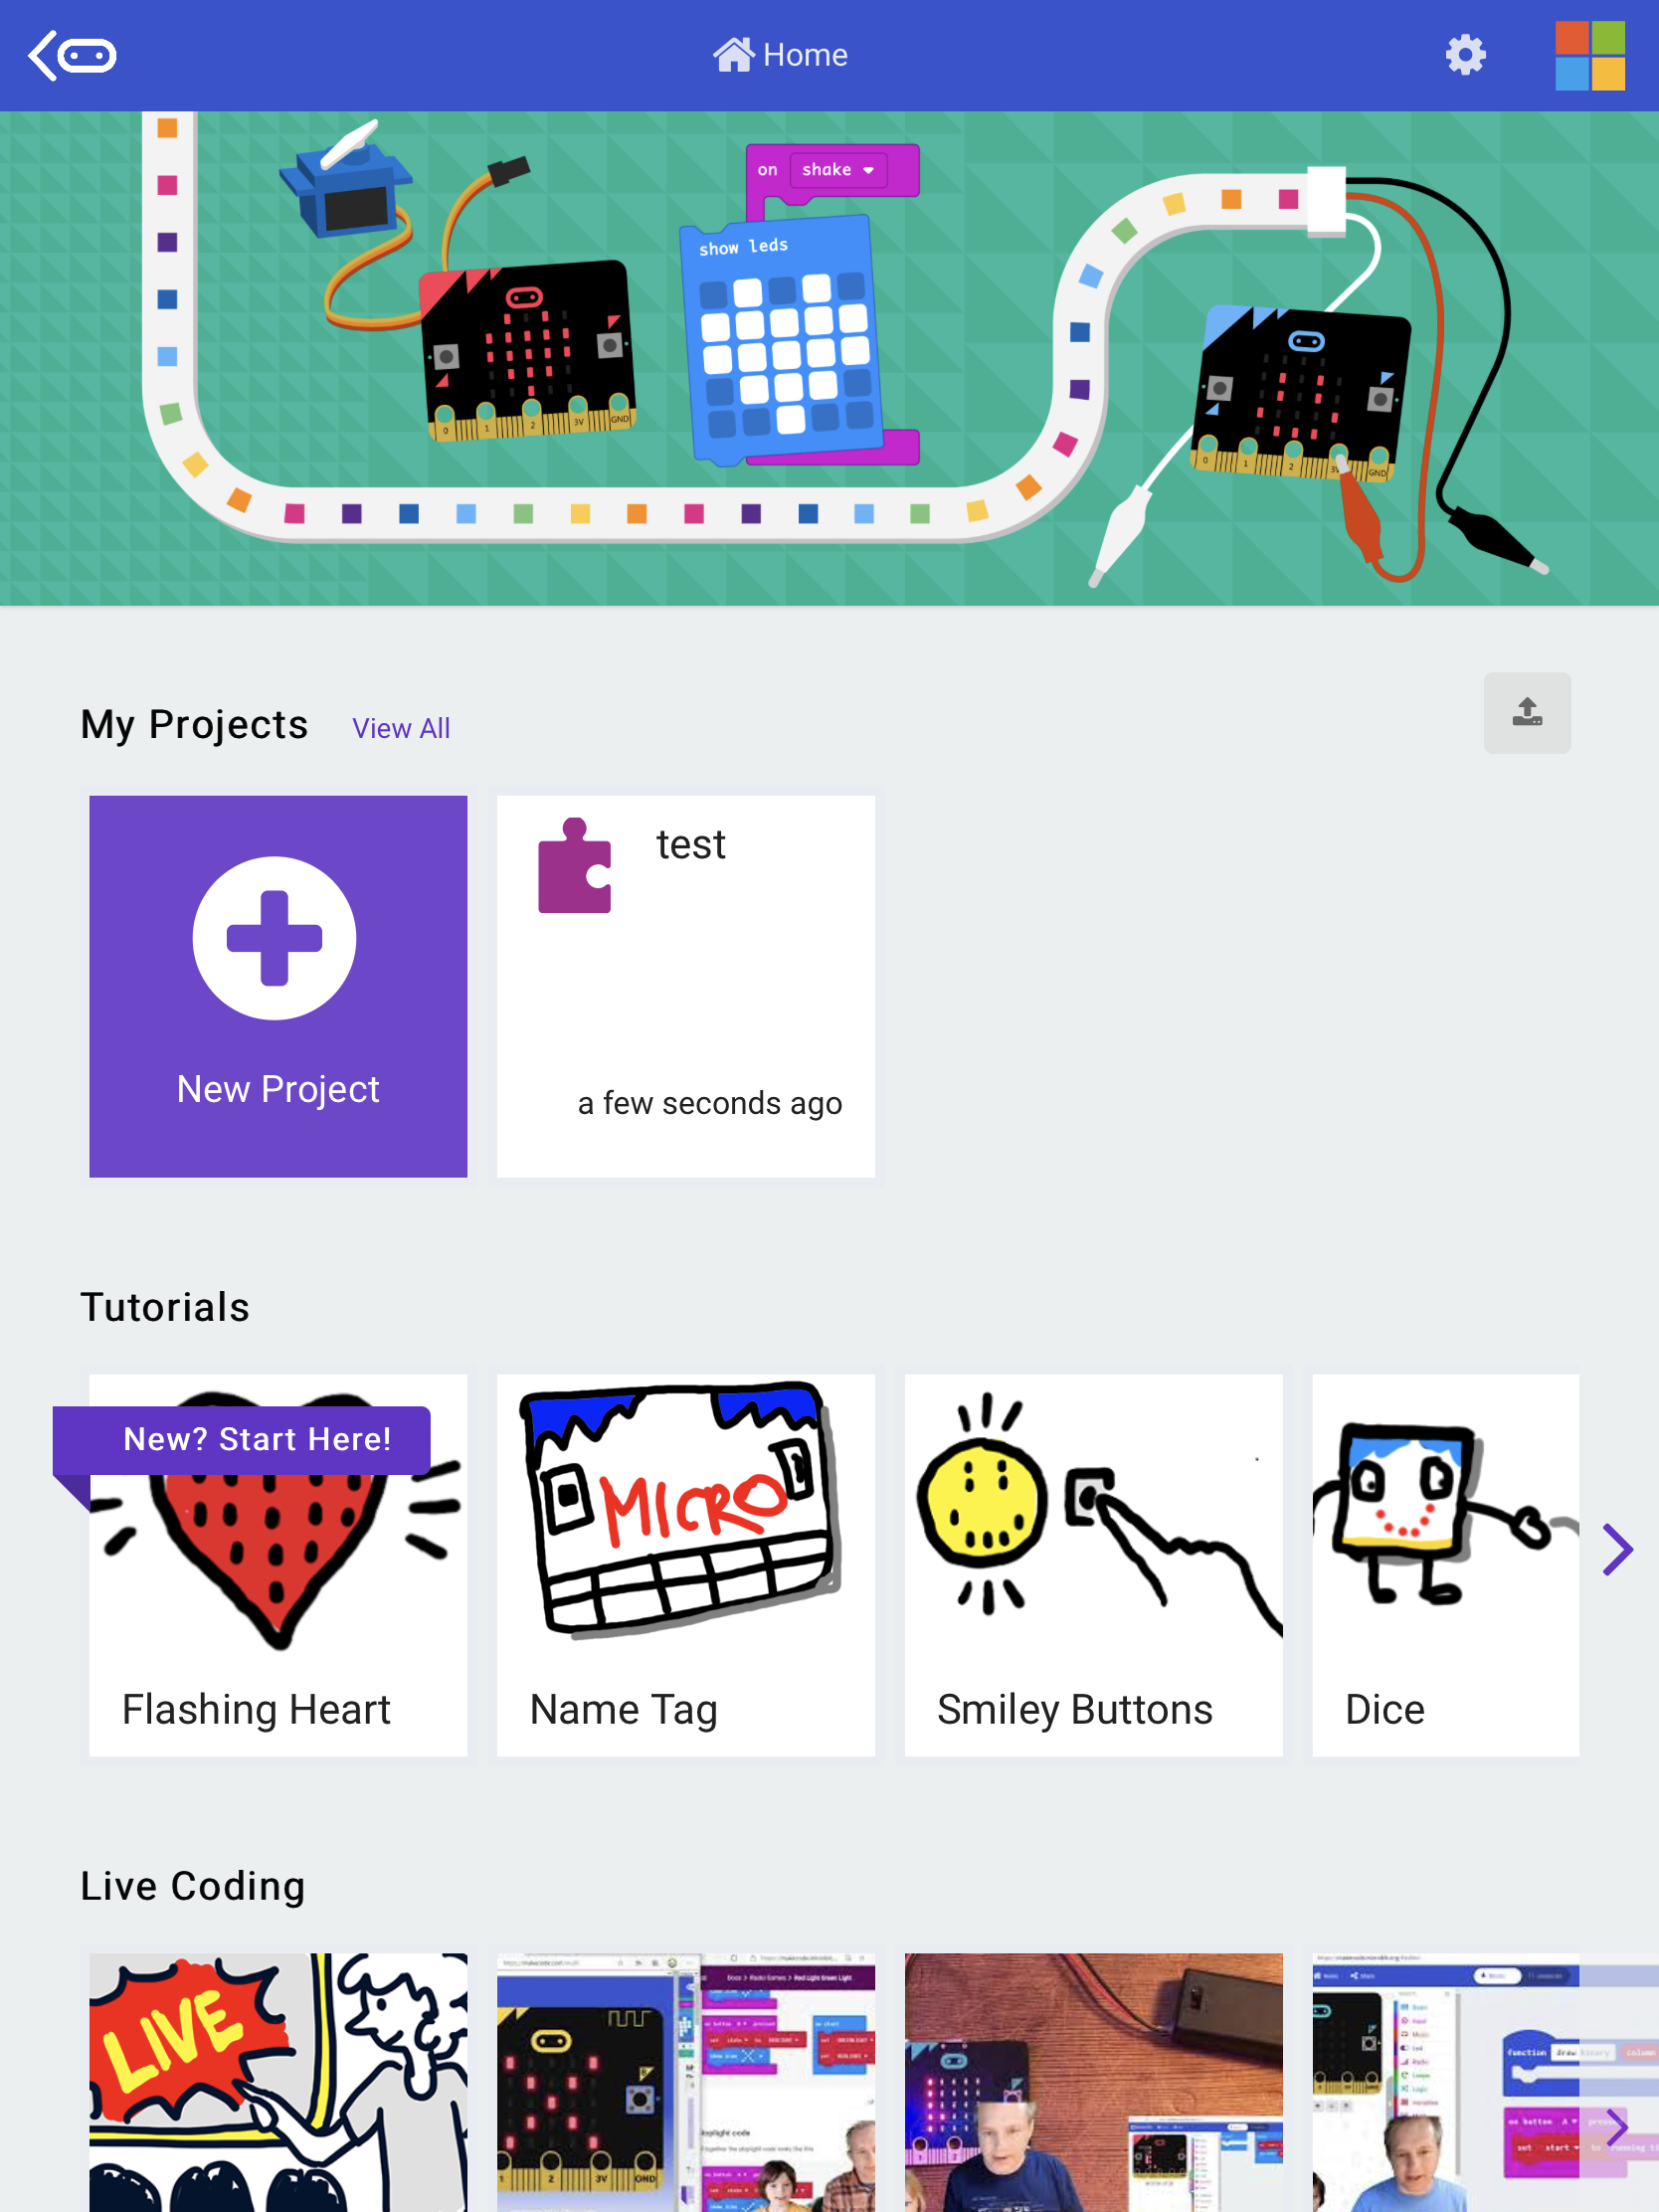
micro:bit offers coding opportunities with both Microsoft MakeCode and Python Editor. For students new to coding, MakeCode offers easy to understand block based coding, that allows students to gain a better understanding of the learning process. Additionally, there are many tutorials that are in place that students can use to gain a better understanding of coding and its use with micro:bit.
While I know you’re thinking “Yes, this tool sounds great but how am I supposed to use it during the current education situation with distance learning? We can’t deliver a micro:bit to every student or expect them to buy their own”. You are absolutely right! While there are limitations that would make it hard to use micro:bit to the full extent, it is still a tool that you can use virtually.
 Through micro:bit classroom, you can set up classes for students to participate in coding challenges. When using MakeCode, a micro:bit simulator is present in the coding platform, this allows you to visualize what it will look like to code specific sequences to a micro:bit, similar to as if you were in the physical classroom. For example, using this simulator along with the music function, you could teach students music lessons while integrating coding. Have the students then create a melody of their own to play back during class.
micro:bit offers a whole world of possibilities for integrating technology into the classroom, both virtual and physical. The virtual micro:bit system is accessible to all for free.
Video Resources:
Web Resources:
 by Devin Flynn (writing & research)
Explain Everything is an interactive whiteboard platform where students and teachers are able to collaborate, share, and learn without boundaries. The canvas can take several forms, such as one of the pre-formed templates, blackboards, or the original whiteboard. In these canvases you have an infinite amount of space where you can add in new or existing media including video, PDFs, images, web pages, and text, creating a truly multi-modal form of learning.
A key feature of Explain Everything is the ability to record motion, audio, and visuals on screen which can be very impactful to learning and understanding. By giving students the opportunity to capture their learning in a manner that best suits their specific learning needs. This tool allows for both students and teachers to reflect on the learning and address gaps in understanding as they emerge, while also highlighting student strengths. Using Explain Everything, you are also able to create templates which help to speed up the teaching portion of your lesson and move into the collaborative learning portion.
When it comes to using this tool, whether it is through a smartphone, tablet, or computer, the opportunities that Explain Everything provides is limitless. It truly is a blank canvas with which you can use your own imagination to create the perfect collaborative space for learning.
 As a part of distance learning education, teachers can design or upload templates for student to work on synchronously or asynchronously. When using a tablet and computer, you can share screens with the class when done synchronously. This allows you to use Explain Everything as a true virtual whiteboard, mimicking the physical classroom.
There are two main versions that can be used with Explain Everything. The free version lets you create up to 3 projects (i.e. whiteboard), you are limited to 1 slide per project, and record up to 1 minute of video. The paid subscription version you have access to unlimited projects, slides, and recording, along with online storage of these projects. These can be purchased and downloaded through either the website or iOS/Android App services.
Cosmic Kids is a yoga program that teaches focus, coordination and self-confidence for 21st-century learners. Cosmic Kids Yoga uses engaging visuals and storytelling that is infused with yoga movements to foster mindfulness and strength. Students can tune into an episode adventure via Cosmic Kids Yoga channel on YouTube and subscribe to this account for free (this is also accessible through YouTube Kids). Cosmic Kids is great for any age group to participate but most yoga adventures are developmentally appropriate for a younger age group (3-9 years old).
Participants will follow the instructor, Jaime, as she goes on her story-telling adventures and participants will mimic her movements during the yoga adventure. Cosmic Kids participants will develop social-emotional skills as they engage in the episodes, specifically growing in self-regulation, focus and empathy. Before participating in an episode, it is important that you have a large open floor space so each person can move freely and stretch their bodies appropriately as the episode progresses. Participants will also gain greater control with gross motor skills as the adventures’ movements require balance and strength. The body becomes part of the story-telling process.
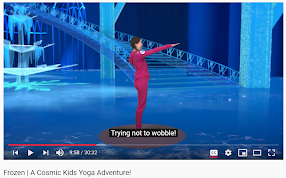
Cosmic Kids uses relevant characters and settings that are familiar to a younger audience such as Trolls, Pokemon, and Frozen to engage their audience. Cosmic Kids is working on adding more accessibility features, like closed captioning, to their episodes. Each episode and story supports learning as characters come across situations that help teach kindness, empathy and promote self-love.
If you would like more information on Cosmic Kids and how they are adapting to the needs of 21st-century learners, they post updates and features on their blog. Cosmic Kids is committed to teaching wellness and has provided content that is relevant to today’s needs to help support young learners and their families, such as Safeguard the Handwashing Soap in response to the COVID-19 pandemic. Their goal is to incorporate more culturally diverse content in their upcoming adventures and to make sure their episodes promote self-confidence and inclusion.
Cosmic Kids does have a website and an app you can download; however, you will need to pay a fee and subscribe for additional lesson ideas and to access select videos.
 by Christina Campbell (writing & research)
and Samantha Snider (research)
GoNoodle is a free website, with a downloadable app, that is designed to teach students through movement. Through physical activity, students develop confidence in themselves as GoNoodle activities enhance students’ overall well-being, fosters academic success and mindfulness. GoNoodle gives the opportunity for all students to be physically engaged and connect movement to life skills and the curriculum to enhance their learning experiences. GoNoodle provides differentiated instruction as it offers accessible features for students. The embedded multimedia (such as the videos with audio) helps students address socio-emotional needs like focus and self-control. Some activities are customized for English language learners and there is the ability to add closed captioning to the videos. It is a great addition to any lesson as a learning tool to get the students actively participating in their learning.
The following are categories and themed activities within GoNoodle:
Each category contains activities that incorporate at least one of the following movement types: guided dance, breathe, stretch, call & repeat, workout, partner up, freestyle, competition, and “brainercise”. As you explore the different activities and movement types in GoNoodle, don’t forget to click the heart icon to save your favourites to a playlist to access later! My favourite Movement Type is Call & Repeat – Milkshake Song; check it out!
When you sign up with a free account, you get to select a GoNoodle character to represent  your activity levels. As you complete the various GoNoodle activities, your character will develop and “level up” (or evolve) to show that the student is actively engaging with the app/website. It takes 10 activities to reach a new character level.
When you create a “new class”, you have the option to create a “class” labelled for each child participating if they want to be responsible for their own character’s growth, or you can just create one class for the whole family to play. However, you can only play one class profile at any given time.
The GoNoodle Blog can be used to gather more ideas, tips, and information on how best to incorporate GoNoodle at home or in the classroom.
The blog is regularly updated with posts about why physical activity is important for students’ learning and ideas on how others in the GoNoodle community are using the app.
GoNoodle is available on Google Play, the App Store, Apple TV, Roku, and Amazon Appstore for download, or can be used directly from your web browser. While this service is available for free, upgrading to GoNoodlePlus ($10 per month) provides access to more learning extensions and video content.
 by Tess Butler-Ulrich (writing & research)
and Bradley Nicholas (research)
BrainPOP is a free multimodal learning platform developed with the aim of making typically complex educational concepts understandable and engaging for students. Available as both an app and browser-based site, BrainPOP offers a variety of units, quizzes, videos, and resources that support both core and supplemental subjects.
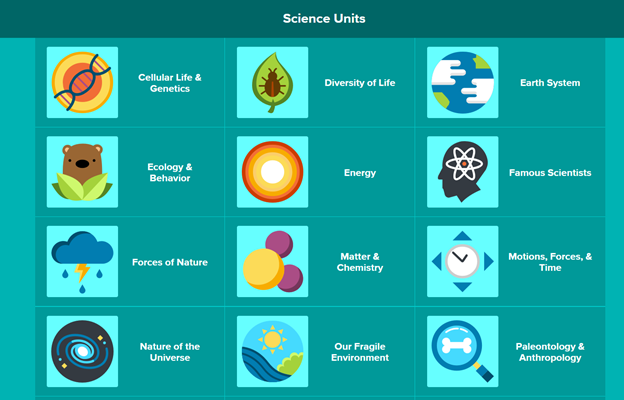
A snapshot of BrainPOP’s selection of science units.
Recently, BrainPOP has developed anti-racist resources that have been added to its comprehensive catalogue of educational offerings.
These anti-racist resources, typically historical in context, can provide teachers with a 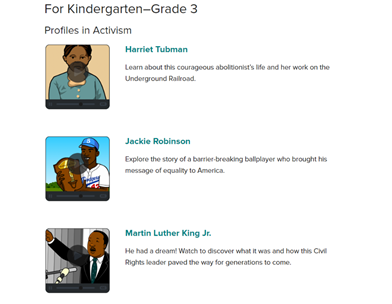 starting point in teaching for social justice. BrainPOP has divided its resources into two age categories: K – 3 and Grade 4+. The K – 3 selection is comprised of Profiles in Activism. These profiles allow young learners to explore significant figures in American history that played an important role in the ongoing fight for racial equality. Each profile includes accompanying quizzes, word games, and supporting consolidation activities that allow children to further explore these topics within a wide variety of contexts (e.g., through songs, drawings, comparisons).
The Grade 4+ resources are formatted similarly, but the breadth and scope of the topics are more advanced in nature, with the specific focus on systemic and institutionalized racism in America. There are also added discussion prompts, which can be used to 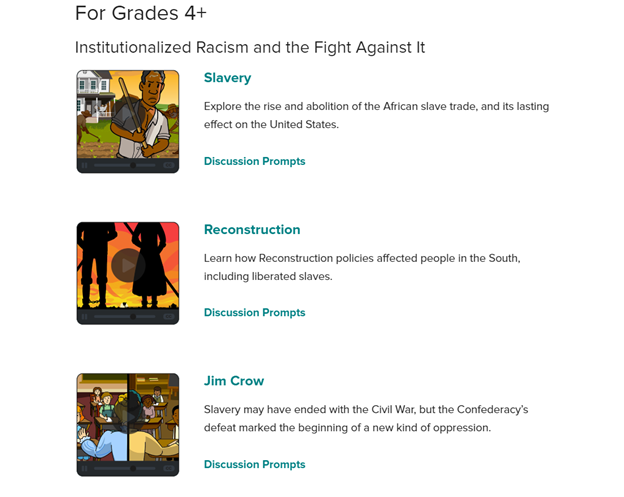 facilitate meaningful dialogue around subjects that some teachers may otherwise avoid.
BrainPOP’s featured anti-racist resources are a great way to introduce activism and anti-racist education to the classroom by investigating the historical context of racism. However, it is key to remember that racism does not exist solely in the past, and that systemic racism is still embedded within our society today. Though focusing on historical racism and the roots of oppression in Canada and America is imperative to building a foundation for anti-racism in the classroom, the work does not (and can no longer) stop there. Teachers must ensure that anti-racist education is not a temporary or fleeting topic in class, nor can racism only be examined through a historical lens. Instead, we must work to build an overarching framework for anti-racism so that it permeates each facet of the class, rather than using anti-racism resources to “check the box” of social justice or anti-racist education. It is not enough to implement a lesson or two with a historical focus. Students need the opportunity to critically investigate racism as both a historical and current issue in Canada, as well as to participate in on-going dialogue in the classroom. To achieve this, teachers must be aware that part of being actively anti-racist is through action and sustained education (of both our students and ourselves). Using anti-racism resources like those provided by BrainPOP is simply one stepping stone on the path to meaningful anti-racist education.
![]()
by Margie Lam
Encouraging math exploration, and discovering how math is relevant to real world applications, Desmos offers exciting options for learning various math concepts. Even more amazing is that Desmos is free! All you need for an account is to provide an email address or sign-in with your google account, then agree to the privacy agreement and you will be set up immediately. There are four tools available for exploration: the graphing calculator, the scientific calculator, the geometry tool, and the four function calculator.
The HTML5 Graphing calculator, desmos.com/calculator, is the original design from Desmos and is an excellent instructional tool for teachers. The graphing calculator has several templates available to build from or the ability to create your own equations in a unique and organized manner. Teachers can develop a lesson on a particular math concept, add functions, images, and even animate on the graph using sliders.
 The graph settings allow for improved presentation capabilities and are accessible for those students who are blind or visually impaired. Teachers can embed or share their creations with students who can then plot more data, change equation values, add variables and integrate more advanced functions including derivatives, integrals, regressions, statistics, trigonometry, etc.. I particularly liked how students can manipulate, experiment and explore graphs, data, and equations at their own-pace in a dynamic way. Should anyone become overwhelmed in self-exploration there are help features with guided walk-throughs and videos to support learners.
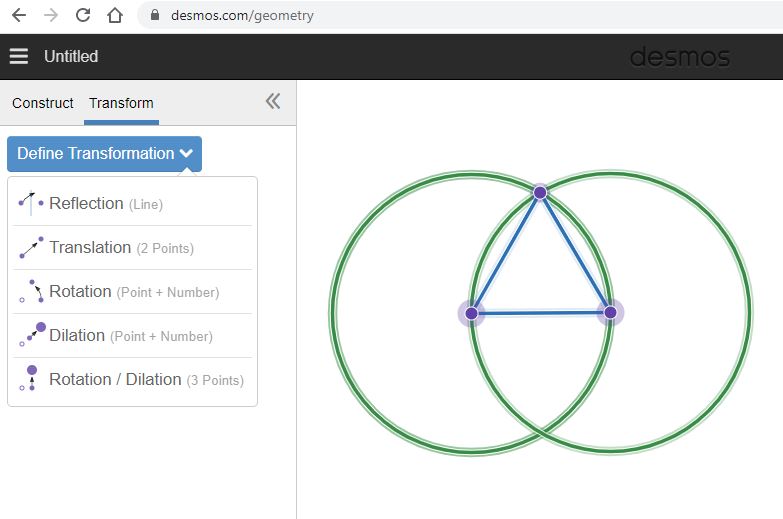 The Geometry tool, desmos.com/geometry, is an exciting development from Desmos where students can explore points, lines, geometric shapes and their transformations in a 2D free-design space. The tool is very easy-to-use with simple creation icons, drag and drop features and standard functions such as undo, delete and save. Students can create and discover from scratch at their own pace, or teachers can share an example they created and ask students to explore further. The remaining tools: four functions, desmos.com/fourfunction, and scientific calculators, desmos.com/scientific, are very easy to use with no-sign required.
Perhaps the most engaging and useful aspect of Desmos is the classroom activities that have been developed with curriculum expectations and real-world applications in mind. At teacher.desmos.com, there are so many different activities related to various themes to choose from. Activities explore a mathematical concept and typically include a real-world application. Each activity is organized by theme and provides an estimated work timeframe, indicators for compatibility to mobile, tablet and laptop, summary of activity, teacher guide, french translation, accessibility features and student previews. 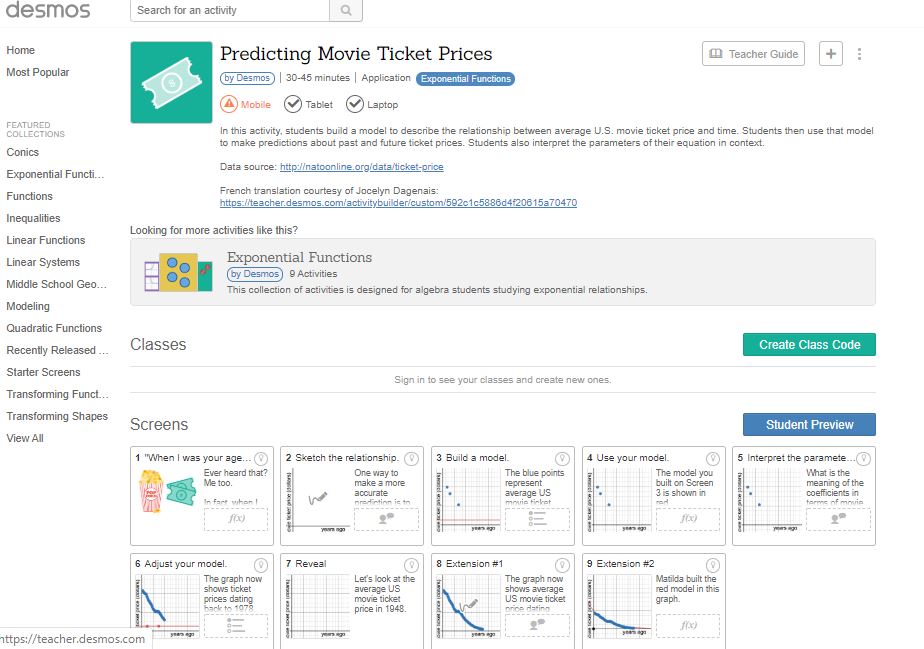
Using an activity is extremely easy, you simply click the create class code button, then review teacher dashboard and a window appears which you can copy and share with students. Students will access the activity at student.desmos.com where they need to enter the class code. The teacher can launch the activity synchronously with students where desmos provides facilitation support and a dashboard that summarizes individual and class data or send to students for asynchronous assignments. 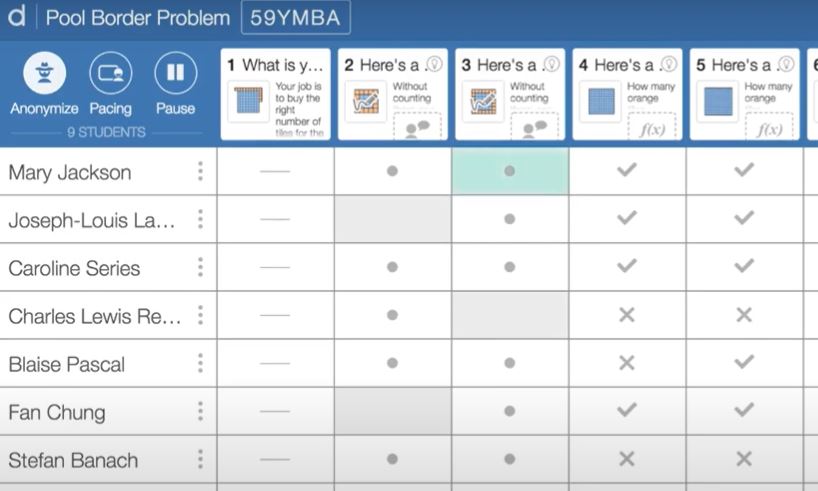 An amazing feature is the automated feedback provided to students as they work through the activity – this not only provides constructive, on-going and meaningful feedback to students but also highlights student responses for teachers in a dashboard summary – no marking required!
Should educators not find an activity that suits their purposes, they can always create their own with the activity builder. This step-by-step guide allows teachers to create and organize their own activities with graph, table, media and sketch components, as well as notes, input and choice features and finally engaging options for marbling activities.
As a teacher, I appreciate the prepared classroom activities with dashboard and automatic student feedback, reducing planning and marking time. I am even more impressed with the graphing and geometry calculators that provide options for student exploration at their own pace and at anytime – ideal for any online learning situation! Desmos does an excellent job supporting teachers and students using their tools by providing many guiding videos and documentation in a clear and organized fashion on learn.desmos.com. I strongly recommend visiting desmos and exploring math in fun and engaging ways!
![]() by Jennifer Robb
by Jennifer Robb
Whether the temporary shift to online learning has you producing synchronous or asynchronous learning material for your students, you may find yourself needing to create short videos to accompany their remote learning activities. Videos have a number of affordances for e-Learning, including:
Luckily, tools like Screencast-o-Matic make the process of recording — and uploading — 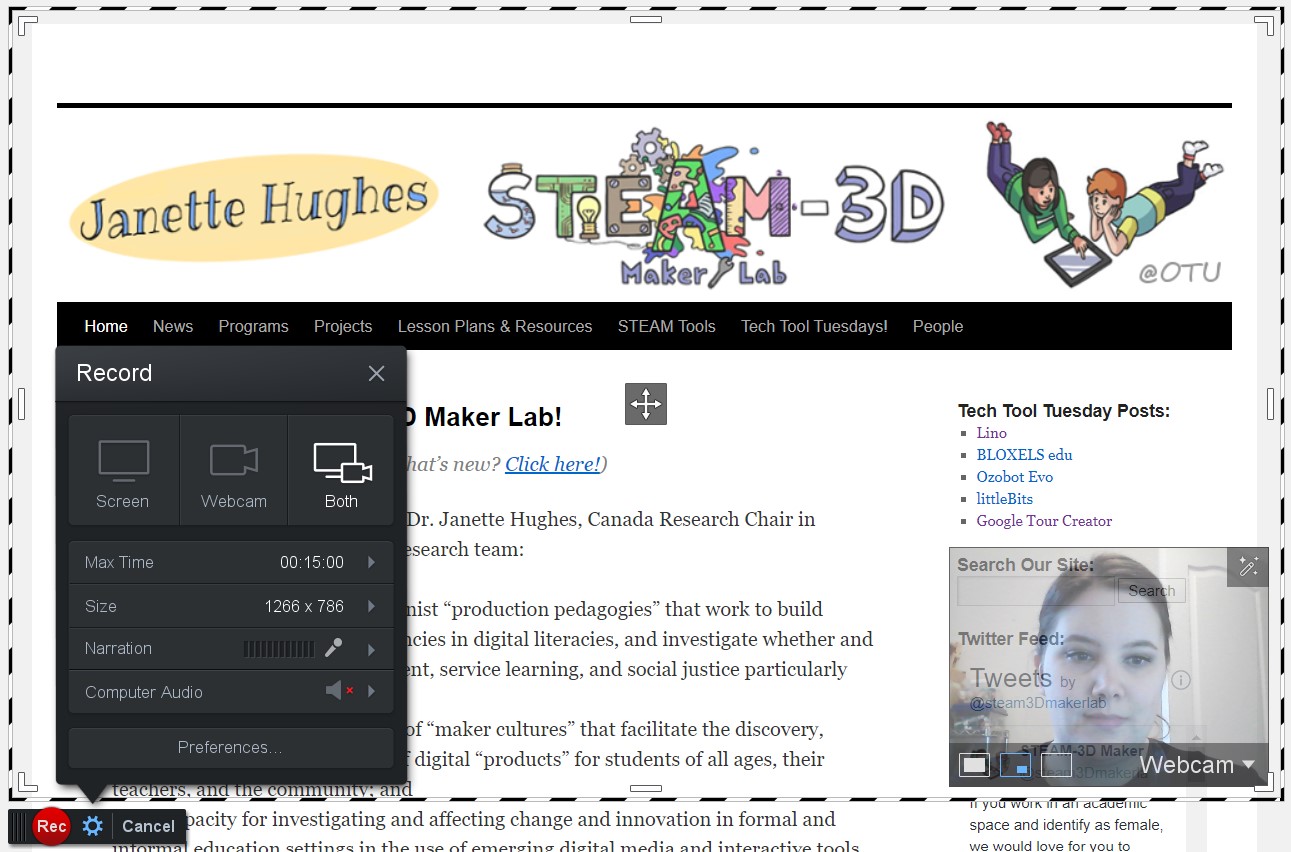 videos super easy. Screencast-o-Matic is a web-based screen-recording software that enables you to record your screen, video from your webcam, and your own audio narration all in one file! They have several levels of accounts available for individuals and teams (pricing plans found here), but for most educators, the free account will do just fine. Recording with Screencast-o-Matic’s basic free account allows for videos up to 15 minutes in length, a small background audio library (if you want to get fancy…), and the ability to upload directly to Screencast-o-Matic’s servers, a classroom YouTube channel, Google Classroom, social media, and more.
All you need to do to get started with Screencast-o-Matic is to create your account and download their small web launcher program. If you use Google Chrome, you may also find it useful to install their Chrome Extension so you can launch the plugin from anywhere! And if you find yourself getting stuck, Screencast-o-Matic has a comprehensive library of tutorials to get you on your way.
Not sure where screencapture videos might be useful in your remote learning program? Here are a few ideas from our recent VPLN sessions:
Use the Twitter hashtag #makeON (or tag @steam3Dmakerlab) to share your ideas for using screencapture videos during this transition to e-Learning!
![]() by Jennifer Robb
by Jennifer Robb
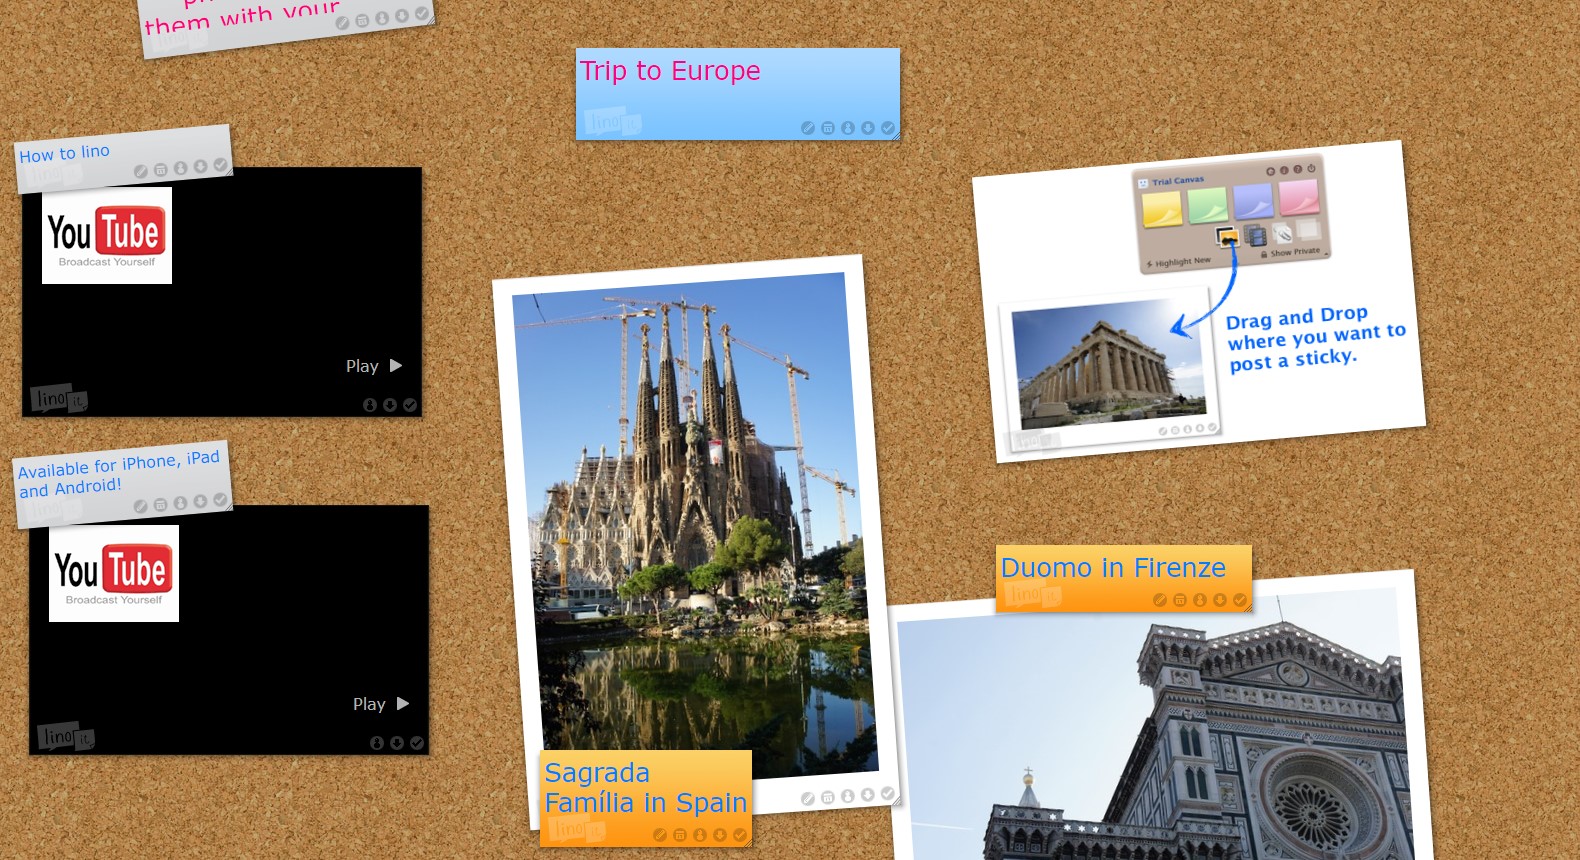
If you’re looking for a free, no-frills app for collaboration, communication, requesting feedback, mind-mapping, or just somewhere for students to jot down their ideas… you might want to check out Lino!
Lino (or Linoit, as some may know it by) is a virtual bulletin board that allows you to add sticky notes, photographs, and more with as much or as little organization as you need. The uses for this collaborative canvas are endless:
 students to post their thoughts (in one colour of sticky note), questions (in another colour), critiques (in another colour), and so on… students can see and respond to other students’ notes on the reading!
If you’ve used Padlet, the concept behind Lino is familiar: a collaborative workspace with limited controls. Unlike Padlet, Lino does not restrict the number of canvases created by users with free accounts. However, there are other restrictions in place. To read more about the affordances for free and premium accounts, click here.
Adding to a Lino canvas is as easy as clicking a sticky note from the “pile” in the upper right-hand corner. Notes can be moved and rearranged once they’ve been created unless they’ve been “pinned” to the board, so expect a bit of virtual chaos as students get used to this new platform — but the learning curve is pretty friendly. After a few short minutes of interacting with Lino, it’s easy to get the essentials! And if you’re still stuck, there are several public canvases available to help show you the way… (like this one)
With the ease of access and an attractive pricepoint (free — awesome!), Lino is definitely worth checking out to get your students interacting with one another online. The visual, “tactile” nature of the bulletin board is fun and engaging, and may be just what it takes to start a conversation!

By: Laura Morrison
BLOXELS has developed Bloxels edu, so let’s explore what’s new!
If you’re not yet familiar with the original Bloxels, check out this short video clip that gives a quick overview of what Bloxels is:
Like the original Bloxels, students can create their own games. They can build in all their own details — right down to the characters, backgrounds, and art! The great thing about the edu version is that now educators can set up classrooms where students can share all their content creation and teachers can view student work, award various digital badges and send students messages.
What I love about the Bloxels platform, in general, is that students can personalize everything they create. It’s a space where students can become absolutely absorbed in the design process and really let their imaginations run free.
And, if we’re talking theory (which we love as a research lab!) Bloxels lets students build social presence and community online. They get the chance to show off a variety of their global competencies’ and skills (like creativity, collaboration, critical thinking) and to project their personalities. They also get to share their work and to try out the games of their peers. Importantly, students might feel a sense of ownership and accomplishment, no matter how far they get in the design process. For example, they can focus more closely on character creation and background design and have a simple game or they can create very simple characters and aesthetic features but create a game with lots of gaming complexity.
Bloxels edu can be used in the classroom in a variety of ways — linking together a ton of subjects and curriculum connections. The company has created a brief overview of the curriculum connections they see, which can be adapted to any of the Canadian curricula. Check out their Welcome Educators! Getting started guide here to see some of the ways to use Bloxels edu in the classroom.
![]() by Jennifer Robb
by Jennifer Robb
This is a first… it’s time for a Tech Tool Tuesday update post! If you’ve been following our blog, you’ll know that we’ve written about Ozobots before (and if you haven’t, check that post out here), shortly after the Ozobot Bit started making its way into schools. Now, it’s time to take a look at the most recent iteration in the Ozobot lineup — the Evo!
Like Ozobot’s Bit, the Evo is a byte-sized (haha, get it?) robot that packs a ton of 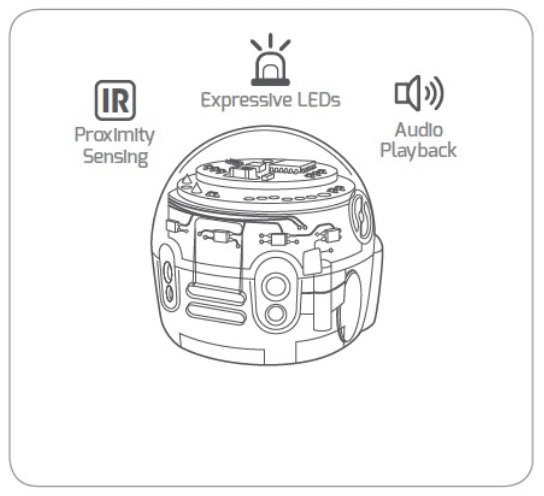 functionality into its tiny polycarbonate shell. In addition to the top-side LED and optical sensor featured in the Bit, the Evo has a built-in speaker, four infrared proximity sensors, Bluetooth capabilities, and five additional LED lights for further customization! The inclusion of additional sensors means that your Ozobot can do more than follow a simple set of instructions — it can be coded to take in environmental information and respond accordingly, enabling users to learn more complex and sophisticated code than was possible with the Bit.
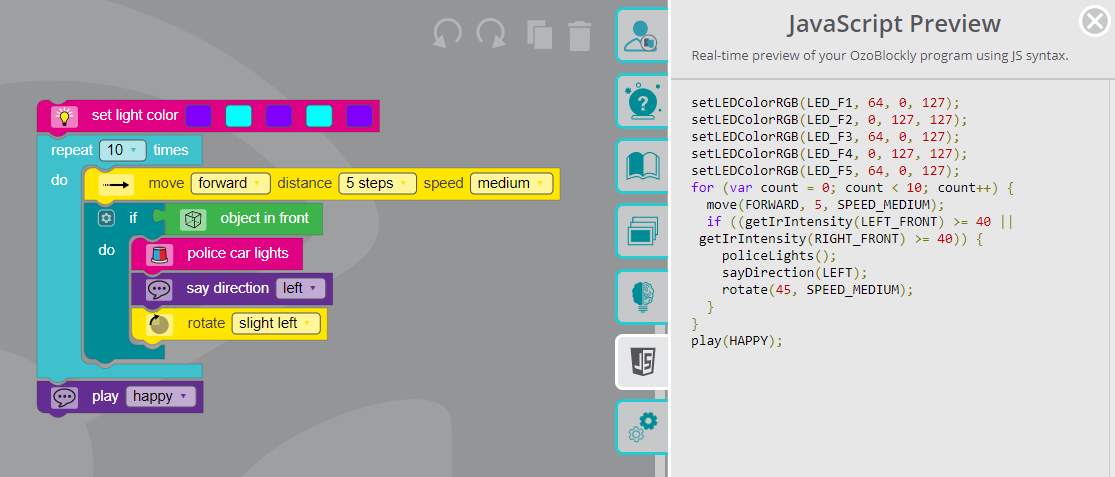
Still a novice coder? No worries! Although so much more is possible with the Evo, Ozoblockly‘s user-friendly interface gives you five different options (from “novice” to “master”), with more codes and functionality becoming available with each increase in coding level. And as you become more comfortable with block coding and are thinking about moving onto a more complex system, Ozoblockly also provides a JavaScript preview so you can view a direct translation between the two coding languages.
In addition to the colour coding (using old-fashioned markers and paper) and block coding systems shared with the Ozobit Bit, Evo has a companion app (available for both iOS and Android; not yet for Chromebook as of this post) that opens up so many more ways to learn! The Evo app allows you to drive your Ozobot with a control stick, provides Ozocode challenges, play the Evo Launch game, access community tutorials and resources, and so much more…
There is so much more this little ‘bot can do that we haven’t even gotten to explore yet — we can’t wait to take them out into the community and put them through their paces! If you’re thinking of picking one up yourself, the Ozobot Evo retails for about $120 CAD* (in comparison to the Bit, which retails for about $65 CAD). While the Bit is a fantastic option for STEAM learning in your school or home, in our opinion, the extra sensors, companion app, and hardware upgrades make the Evo worth the higher price point!
* Retail price accurate as of March 17, 2020.
![]()
![]()
![]()
![]()
![]()